Saturday, January 26, 2013

Wood You Dream?


Happy Saturday!  It's a beautiful day here in Gainesville, Florida!  The sun is shinning and it's going to the mid 70's today.  I'm planning to walk to the farmer's market in the little village center less than a mile from our new home and then maybe go for a nice long bike ride this afternoon.  I'm enjoying all the walking/biking trails in the area.

I've been super busy as usual.  Still trying to settle into the new place and working on decorating now.  Plus I've had lots of orders with the shop over the last couple of days.  So I'm running a little behind and have a late posting of my Saturday Our Creative Corner post.  Liliana is our host again this week and her challenge is "Woody with a Button".  We are to use some sort of wood, real, faux, stamped, embossed, etc.  I've had some real wood, thin bark-type strips that I have never used.  I was afraid to put it through my Cuttlebug as it was a bit thick and I didn't want to break it.  So I cut a piece of chipboard with the TH Baroque die, traced it onto the bark and then hand cut  it out.  That worked just fine.  I was afraid the bark might be very brittle and sort of fall apart, but it actually was quite tough and flexible.  The edges were sponged with Vintage Photo DI.
My main focal piece was stamped in Sepia archival with the Artistic Outpost Birds of a Feather bird, masked and then the text BG was stamped in Jet Black archival, the edges torn and sponged with Vintage Photo and Black Soot DIs.  Using a piece of Chocolate Chip CS, I stamped the little flourish stamp from Birds of a Feather around the outer edge and white embossed it, then scissor distressed the edges and sponged them with Vintage Photo.

The leaves are Ranger foil tape over card stock, cut with an old Sizzlet die, run through the Regal Flourish texture fade and painted with the Vintaj Weather Copper patina paints.  My flower is various fabrics cut with the Tattered Florals die, plus a bit of vintage crochet work and a rhinestone button from Melissa Frances.  The Dream stamp is from the Artistic Outpost Huck Finn set.

So that's it for my Our Creative Corner make for this week. Hope you will stop by and see what the rest of the team has to jumpstart your creativity for the weekend!  Thanks so much for stopping by and for all your lovely comments.  I so appreciate your encouragement and support!


All these crafty goodies can be purchased at The Funkie Junkie Boutique:


Thursday, January 24, 2013

Woohoo! Happy Mail from Ranger

I got a happy email from Ranger Ink last night that my order of some of the new products has shipped!  It is scheduled to arrive on my doorstep on Monday.  I have set up listings in the store for the full set of the new Tim Holtz distress paints - $89.99 for the set of 24, as well as the full set of the new Dylysions sprays - set of 6 for $22.50.

I also have all the newly released Tim Holtz "blueprint" stamps coming in on Monday and they have been listed in the boutique also.  Check out the New Arrivals tab in The Funkie Junkie Boutique to see all the new products.  Quantities are listed there so you can see how many are in stock.  You may want to act fast for the full sets of the distress paints as I only have 9 right now and once I re-order, it could be months before I get more.
I will also be listing the distress paints and Dylusions sprays individually, but that will take another few hours before those listings appear.

Happy shopping!


Wednesday, January 23, 2013

Sprucing It Up


Hello and welcome!  I'm back today to share my project for this week's new Frilly and Funkie challenge. Our host this fortnight is Rebecca and she is challenging us to Spruce it Up!  In Rebecca's words "take a look around your desk or workspace and the things on it that you use to organize, communicate and run your life. It's amazing how we stop really seeing those everyday items! Think of calendars, birthday/anniversary planners, writing implements, checkbooks, iPads, index card files, cell phones, file folders, etc.. Then, set yourself the challenge of making one of those 'plain jane' items into something that makes you smile, every time you use it!" 


I have a few empty Starbucks bottles that I have saved and decided to spruce one up to use it to store my vintage buttons.  I added some small doilies, burlap, a couple of hearts cut from vintage book pages, Venise lace appliques that I hand painted.  I also made a shabby flower with some net type fabric, burlap and canvas.
This looks terrific sitting on the shelf of my newly organized craft room.  I have several more empty Starbucks bottles that I will also alter to make a set.  Thanks so much for stopping by today!   Please stop by Frilly and Funkie to see what spruced up goodies the Frilly team has to share.

And I couldn't resist adding this to the Simon Says Stamp and Show What are You Known For? challenge this week.  I think I am somewhat known for my shabby chic style.


These products used on this project can be purchased at The Funkie Junkie Boutique:

Sunday, January 20, 2013

Paris Collage


Inspired by Anna Dabrowska aka Finnabair, I decided to try my hand at her style of collage.  She is a genius whom I have admired for some time now.  I'm a hacker but I have to say that I did have a blast getting inky with this.  She has a great how-to video on her style, very long but worth it if you have an interest in creating in her style.

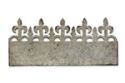
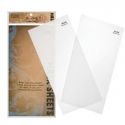
First of all, I have no stencils and no Glimmer Mists so I had to improvise in a major way.  I cut a stencil/mask with the On The Edge Iron Gate die and some of Tim Holtz's mask sheets.  I created some sprays with Mini Misters and Distress Stains like Tim showed on his blog last week.  I do have Dylusions sprays and Adirondack Color Wash sprays available but their colors are so intense that I was afraid to use them.

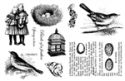
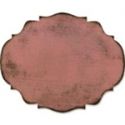
Having set the stage, I took the plunge.  My stenciling and masking was done with Bundled Sage and Faded Jeans DS/misted and then I sponged a little Black Soot using the stencil.  I then added stamps from Paris Exposition stamped in Jet Black archival and then a few more from Ephemera Backgrounds stamped in Sepia archival.  The three main photo stamps were stamped in Jet Black archival and deckle cut the edges making them look like old time photos, then sponged with Vintage Photo to age them.

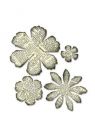
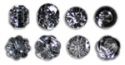
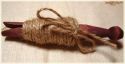
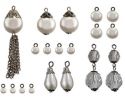
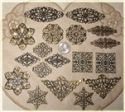
I made a little embellishment using the Spellbinders cross die and some soda can aluminum plus some Vintaj patinas, used the TH Hardware die to cut fasteners, which were painted with black acrylic and then run through the Damask TF, coated with UTEE and finally I rubbed a little gold paint over them.  I used some black Vintaj patina paint to coat some filigree metal and also rubbed them with the gold paint.  And then found a couple of old rusty keys in my flea market finds stash.

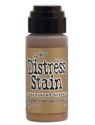
Now comes the hard part for me.  Anna then sprays her masterpieces with Glimmer mist, including a final shot or two of black - that scared the crap out of me!!!  First, what color should I mist it with?  I finally decided to use some alcohol ink that I have had tucked away in Mini Misters.  When I first started using the alcohol ink, I put them into Mini Misters and used them that way.  Then I took Tim Holtz's Creative Chemistry last year and learned that you should NEVER put alcohol inks in Mini Misters, so they have been sitting pushed to the back of my shelf.  I pulled out Current and added a bit of rubbing alcohol to water it down and gave my collage a couple of mists.  Then I put some Tarnished Brass DS into a mini mister, added a bit of water to dilute it a bit and gave the piece a few sprays of that.  I was not impressed with the look of it.  I hemmed and hawed for about 30 minutes about adding a spray or two of black mist.  I wasn't happy with how the piece looked after the first couple of mistings so I finally thought what the heck and gave it a couple of sprays with Black Soot in a Mini Mister.  I still wasn't happy.  After studying it and mulling it over, I found a tiny, very stiff paint brush and used it to apply some shading with Black Soot DI.  That helped making things pop a bit.

The jury is still out on this.  I sort of like it, but am not satisfied.  I guess it is a first step and I did have a lot of fun with it so it is probably something I will try again.  But now what do I do with it?  It's not a card, and not really a wall hanging.  This one will probably sit on my shelf for a few months and then go in the trash, after I pluck off all the metal parts to be recycled.  Or maybe I should keep it to compare to later pieces so I can track my improvement...humm??  We'll see...

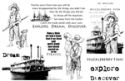
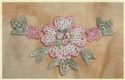
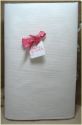
Oh, almost forgot - here is a quick shot I took of the stamping/stenciling collage before I mucked it all up.  I really like how that part came out.
I hope you are having a great weekend.  I've listed below all of the products I used here that are available at The Funkie Junkie Boutique.


These products used in this piece are available at The Funkie Junkie Boutique.  Ranger/Tim Holtz brand products are always 20% off MSRP!
Blog Widget by LinkWithin


I changed my font at thecutestblogontheblock.com