Wednesday, August 31, 2011

Simon Says Let's Have a Blog Hop!


Hello and welcome!  If you arrived here from the lovely and incredibly talented Jo's blog then you are going in the right direction otherwise you need to start at the beginning on the Simon Says Stamp Challenge.

For the second year in a row, Simon Says Stamp and Show & The Simon Says Stamp Challenge are joining forces to bring you a SUPER hop and treasure hunt to celebrate the approaching fall and winter holidays.
To help celebrate, they will be giving a BIG BASKET OF CRAFTING GOODIES to the winner of this hop PLUS three $25 VOUCHERS to the Simon Says Stamp Store ! (whoo hoo - good stuff there!!) The vouchers will be the hidden treasure on three DT blogs and you have to find them.
The Blog Hop will start on August 31st on the Simon Says Challenge Blog and will finish September 5th on the Simon Says Stamp and Show Blog.
The theme for both challenges this week will be ANYTHING GOES. You can make anything you like … a card, an ATC, a scrapbook layout … the possibilities are endless! You will need to hop through each blog, find the little parcel of goodies and make a note on which designer’s blog you found them.  The last stop on the hop is the Simon Says Stamp and Show Challenge Blog.  You will need to leave a comment there with the names of the three blogs with the hidden treasure.  The last stop on the hop is the Simon Says Stamp and Show Challenge Blog.  You will need to leave a comment there with the names of the three blogs with the hidden treasure.  The comments will be moderated so you will not be able to see the answers.   You MUST enter the challenge and link your creations with the Inlinkz on the Stamp and Show Challenge to be able to win the Grand Prize or any of the $25 vouchers.  You do not HAVE to comment on all the DT blogs but we would appreciate any comments you would like to leave.

If you loose your way at any time, a full list of all the participating blogs with links will be available on Simon Says Stamp Challenge and the Stamp and Show Challenge blogs. For more details please refer to the Simon Says Stamp Challenge or the Simon Says Stamp and Show Challenge blogs.

For my project, I made a Christmas tag triptych using many Tim Holtz techniques.  I went through his blog and looked at the past 12 Tags of Christmas for inspiration.  Drawing from his work and techniques, I designed my tags using his new Christmas set Mini Holidays 3 and an older set Mini Holidays.  I also used lots of his products including distress inks and the On the Edge Snow Flurries and Tag and Bookplates dies. Even though I drew inspiration from Tim, I feel that the work is entirely my own - it has a very Funkie Junkie spin to it.  In fact, I have decided to create my own 12 tags, adding another nine to this piece over the next couple of months.  Sound like fun?  Maybe you'd like to join in with me  - stay tuned for details.

I would appreciate a comment if you would like to leave one  and just a note to my regular readers - I left out all the details of the techniques and materials used here.  I know that blog hoppers really want to grab the essence of the post and move on so I didn't want to hold hoppers up with the myriad of deets.  For inquiring minds that want to know, see my post below dated August 31st.

That wraps up my part of the hop.  Thanks for stopping by.  From here you need to go to the amazingly talented Marcea's blog for more inspiration.

All the Deets on My Christmas Tags

Hello friends!  So glad you stopped back by to check out all the details on my Christmas tag triptych.  I really agonized over what to make for the Stamptember blog hop.  Both of the sister design teams for Simon Says are made up of such incredibly talented designers and I want to make sure my work is up to their level.  So I considered and rejected different options for a week before I finally settled on the tags.  And then when I did get started, I still had a difficult time because I had no real concept going in.  That is not unusual for me.  I actually enjoy sitting down with no preconceived ideas, just some stamps or images and maybe a bit of paper and just seeing where my creativity can take me.  I looked over all the Tim Holtz Christmas tags and saw some techniques that I wanted to play with, but it wasn't until I relaxed and let my own style take over that the project started to take shape.

As promised, I'm going to break down the techniques and share with you some links for more information.  All of the stamps except for the flourish are from the new Tim Holtz Christmas set Mini Holidays 3 or his older set Mini Holidays.  The flourish is from his Fabulous Flourishes set.  I cut tags and thin cardboard backing to match with the Tag and Bookplates die and layered them together so the tags are stiff and will stand up.  I decided to make part of my theme 'December 25' so started with the 25 stamp.  I used one of the bookplates from the die, cut from cardboard/chipboard.  I initially embossed it with Weathered Wood distress embossing powder, but later decided to go with only golds.  I already had the Gold Alcohol Ink Mixative on my desk and had been using it for other things so I just gave the frame a coat of the gold mixative.

The holly leaves were stamped on Very Vanilla and ink distressed with Vintage Photo DI, fussy cut and then green Stickles was applied.  The Merry Christmas was stamped in Ranger Jet Black archival ink onto Kraft Glassine, dried with the heat tool and snipped out to be layered over the holly.  Notice the gold dots in the upper right corner?  I really liked what TH did on his tag (see Day 6/Steps 15 & 16) but I don't have the speckle stamp nor did I have any gold acrylic paint so I improvised.  I found a stamp in my stash that had dots on one side and used that.  For the gold paint, I had some gold dimensional paint and managed to use that.  The holly on Santa's head has Antique Linen distress stickles applied.

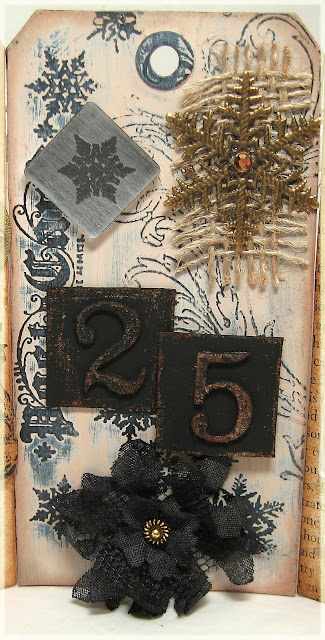
For the center tag, I used three main techniques - the etched glass Fragment (see Faux Etching on this post - you have to scroll down a bit), the printer's block letters (see GrungeBlocks) and the shabby chic technique on the tag itself.  I must say, the faux etched glass technique was really fun and cool to do.  And of course, since I introduced black into the color palette, I had to add one of my shabby crinoline flowers.  And, hey, like that snowflake metal piece?  It's new in my Etsy shop.  You can get a pack of just snowflakes or purchase a bigger metal pack with them in it.

On the far right tag, the tag base was covered with a sheet from an old book and then tape was applied and ripped off to remove part of the print (see Day 11, Step 18).  Then it was masked and misted with the Vintage Photo/Perfect Pearls (that I often refer to as my homemade glimmer mist).  It's all here in Tim's post.

I used Metal Foil Tape Sheets to cover the GrungeBoard letters.  Check out Day 10 here for the metal technique.  Then I dripped Caramel alcohol ink on the metal and let it run all over it.  I had the brilliant idea of painting the raised letters with the gold mixative, but some of the gold ran off and onto the base.  So I added more Caramel and pretty soon the gold mixative was running all over the base.  I gave up on trying to correct it and decided that I LOVED the way it looked - a happy accident that I couldn't repeat in a million years - LOL.  Then I repeated the same mixing of the caramel alcohol ink and gold mixative on the strip of acrylic that I cut with the On the Edge Snow Flurries die.  I added another faux etched fragment done with the pine cone stamp, some corrugated cardboard stars that I also brushed with the gold mixative.

So them's the dets, folks.  At least for the first three tags.  I'm going to make my own 12 Tags of Christmas this year and I was thinking it would be fun to invite you all to play along.  But I'm not going to do them in 12 straight days running like Tim does.  I'm going to do one per week and if you would like to play along, you can upload your project using the linky that I'll provide.  Please use my tag of the week as your inspiration.  You don't have to make a tag.  You can make a tag, a card, an ATC or any other paper craft project that will help you prepare for Christmas.  We'll get started next Wednesday, after the blog hop is over.  If you don't have a blog, you can use another hosting site such as SplitCoast Stampers.  You can play along at any time up through December 1st and at the end we'll have a drawing for a random prize.  Hope you'll want to join in the fun!

Monday, August 29, 2011

Not Much of a Sneak Peek

Good morning Blogland friends!  So happy to be back with you today after last week's Irene excitement.  I hope that all of you came through the storm unscathed.  If you are wondering where my normal Monday make for Simon Says Stamp and Show is, the normal Simon Says Stamp and Show challenge is running an extra two days this time to coincide with our upcoming blog hop.  Our current travel challenge will run through Tuesday night and Wednesday we'll kick off our 30 days of stamping fun with Simon Says Stamp and our Stamptember Blog Hop with our sister design team.


Lots of prizes are going to be happening with the blog hop.  For the second year in a row Simon Says Stamp and Show and The Simon Says Stamp Challenge will join forces to bring you a SUPER blog hop and TREASURE HUNT to celebrate the upcoming fall and winter holiday season.  

I hope you will drop by on Wednesday to join in the hop.  And you'll get to see what I made.  Can you figure it out from the sneak peek?  No?  Don't feel bad, neither can I - LOL.  It's a work in progress so all you are seeing is bits and pieces.  I had fun Sunday puttering around making all those cool elements.  Now I just have to assemble it into some kind of artistic order...humm....what shall I make???  

Hope to see you back here on Wednesday!

Friday, August 26, 2011

A POP of Red

Hello and happy Saturday!  Those of you in the path of Hurricane Irene, please know that I am praying for you, for minimal damage and no loss of life.  I was so worried about Miami and Florida the beginning of the week and feel that we received such a blessing by being spared.  I was fortunate that I didn't have to take time out to prepare/flee from this incredible force of nature and relieved that I was able to continue my crafting - LOL!

This week over at Our Creative Corner, Vicki is again our hostess and she has a brilliant color challenge for us.  It's black and gray with a pop of red.  Red is my favorite color and I just loved working with the reds here.  I found that this is an incredible color combination and certainly shall be putting it in play again some time!

I know everyone has probably done at least one dressmaker form as they have been all the rage over the past year.  So far, I have resisted, but that pop of red for the skirt just wouldn't leave my mind and I finally succumbed.  All of the stamps are Tim Holtz except the sentiment which is JustRite Stamps. I heat embossed the needle book and the spool seal and stamped the rest in Ranger Archival Jet Black.

The tulle gave me the biggest problem.  It started out as white and I tried dying it in little dye puddle with reinker mixed with water.  It kept coming out pink.  I tried doing that three times, each time making the color stronger.  No luck.  I finally ended up putting on a rubber glove and just smooshing the tulle into a Red Riding Hood ink pad.  And oooh, how about that gorgeous red seam binding.  I dyed that too - didn't it come out a wonderful color?  How I LOVE RED!!!  I used another wooden button from my Etsy shop and also a sweet little spool.  Have some of those to sell too, just haven't had time to list them yet!

So that's my fun little make for this week.  Hope you will stop by Our Creative Corner and see the wonderful mojo starters our talented designers have for you.

Thanks so much for stopping by and for any comments you wish to make.  And of course if you have questions, let me know as I am always happy to share.

Monday, August 22, 2011

A Journey of 1,000 Miles Begins With...a luggage tag?

Can you believe it's Monday again?  Where does the time go.  Where did the summer go?  School is back in session here in Miami starting today so I guess summer is officially over.  Too bad hurricane season isn't over too - I'm startin' to get a little nervous about that.  

The bright spot on the horizon today is that it's time for another cool challenge at Simon Says Stamp and Show.  Our theme this week is travel - show us something travel related.  There are so many wonderful ways to create travel art.  I'm sure we are going to see some amazing projects this week.  And speaking of amazing projects - wow!!! The SSSS design team has OUTDONE themselves this week.  You MUST stop by the blog to take a gander!
And since we are talking about Simon Says, I just want to give you a heads up.  For the second year in a row, Simon Says Stamp and Show and The Simon Says Stamp Challenge are joining forces to bring you a SUPER hop and treasure hunt to celebrate the approaching fall and winter holidays.  So next Monday, I won't have a Simon Says project for you.  Be sure to come back on August 31st to start the hop.  It will run through September 5th.  Our ever-generous sponsor, Simon Says Stamp is offering some great prize packages, and there will be other opportunities to win some blog candy too! 

Now, about my project for the week.  I challenged myself to think out side of the travel box this week and do something a bit different.  I've been inspired by my team mate Sarah Engles-Greer with her cool grunge cuff from a few weeks back as well as remembering the iPod case my former team mate Kim Costello made with GrungePaper.   So with those two examples to inspire me, I set out to make a luggage tag  - something that is practical, useful and somewhat unique.  Don't you hate it when you go to retrieve your luggage and everyone has black wheeled bags?  Sometimes the only thing that sets them apart is the luggage tag.  

To start I cut a strip of GrungePaper 4"x12" and folded it in half.  Using the Tag and Bookplates die, I laid the folded GrungePaper over the tag die so the open edges of the GrungePaper covered the top part of the tag die entirely.  That left about 1/2" open, not covered by the folded GrungePaper, at the bottom and ran it through my Cuttlebug to cut it.  Then I folded one of the tops down just a tad over 1".  Next I stamped it with a number of travel icons from the Tim Holtz The Journey and the Crafty Secrets Journey set using Ranger Jet Black archival ink.  When the ink was good and dry (helped along with my heat tool), I sponged it with Rusty Hinge distress ink and again helped it dry with my heat tool.  I cut a 3x4 1/8" window piece for the inside out of GrungePaper, used a die to cut out the inside and sponged it with  Rusty Hinge ink.  I cut a piece of acetate a hair smaller to fit underneath and machine stitched both pieces to the body of the tag, then ran the stitching all around the edges for decoration.  

On the front, I inserted a button magnet and glued the flap down.  Then I cut a smaller piece, sponged, stamped and stitched it and adhered over where the magnet was glued.  I glued a piece of filigree metal to the front of the inside pocket for the magnet to gab onto to close the tag.  A loop was made with GrungePaper and the Hardware Findings die, sponged with Faded Jeans distress ink and affixed with an eyelet so it would stay put.  I glued a Foliage metal piece with a rhinestone over the eyelet.  For a final piece of decoration, I cut two pieces of acetate from some packaging I had saved with the Tattered Florals die and dabbed it with Ginger Alcohol Ink.  I added another Foliage piece and a brad and called it finished, but now that I look at it, I'll glue something over where the brad showes on the inside - probably a soft grungepaper flower so it doesn't scratch up the acetate window.

Oh, I forgot to tell you, before I stitched but after I did all the inking, I ran the whole thing through the Cracked texture fade to give it some texture.  It now has almost a suede feel to it.  
Whew, lots of information here - hope I didn't bore you!  Many steps and it took a number of hours, but all went well and I enjoyed my time crafting it so that's what counts!  Now please be sure to stop by the Simon Says Stamp and Show challenge blog to see the other designers' projects.  And then get working on your travel entry so you can play along and maybe win the $50 shopping spree at Simon Says Stamp.

Thanks for coming by.  I'd be happy to answer any questions you may have.  See you back here on August 31st for the second annual Simon Says Stamp holiday blog hop.    


P. S.  I'm sharing my project over at Sarah's My Mojo Monthly.  Her theme this month is Muse and Use it and she is inviting us to make touchable and usable art.  I think my luggage tag fits the theme perfectly.

Saturday, August 20, 2011

OCC Sketch With a Vintage Twist


Hi ya friends!  Thanks so much for stopping by today to see what I have made for my weekly Our Creative Corner sample.  Our hostess this week is the lovely and talented Vicki Burdick and she has a sweet sketch to challenge us this week.


As soon as I sat down to work on this project, I realized it was a perfect opportunity to work in some of the new vintage style crepe paper I have in the Etsy shop.  If you have been reading my blog for awhile, you will know that I absolutely LOVED using the Melissa Frances vintage style crepe paper on some of my projects last spring.  I was able to track down what I believe is her supplier and purchase the same type of crepe paper in autumn colors for the shop.  I knew that circle element needed to be edged with vintage crepe paper.

And then there are the very cool new wooden buttons I have acquired for the shop too.  They are ultra sweet - smooth wooden buttons with a lovely floral pattern on them.  I loved them the minute I saw them and could already picture them embellishing my cards.

To make the ruffle, I cut a thin strip of crepe paper and ran a basting stitch along one edge.  Then I pulled one thread to make it gather, kept pulling until I thought I had about the right length to go arouind the edge of the circle.

Here you can see how as you pull one of the threads, it gathers and curls around on its own.  Humm, I do believe I see some paper flower possibilities here too.  Maybe I'll get to play around some with the crepe paper this weekend and see what else it can do.  


Once I had it gathered to the right length, I tied the strings in a knot so it couldn't ungather and then glued it around the edge of the circle.  You can adjust how much shows over the edge on the front.  I also popped it up to make it lay better.  Here you can see what I use for popping my layers up.  It's actually the padding that is put between produce for shipping.  I work in a food pantry and once in awhile we get fresh produce - tomatoes, apples, pears - things that are cushioned and not just thrown in a bag like potatoes.  I don't throw anything out so when I see these spongy little sheets, I snag them and bring a stack home.  It saves me from spending my money on foam tape - LOL!

Here are the other supplies/tools used on this piece:
Outer shell - Very Vanilla, then Chocolate Chip and SU Springtime Vintage DSP.  Front panel is Pale Plum layered over Perfect Plum.  The Pale Plum was dry embossed with an SU EF.  The edges were scissor distressed and sponged with Vintage Photo.  The circle was cut with a Spellbinders circle die and stamped in Pale Plum, Perfect Plum and Always Artichoke with stamps from the new SU Field Flowers stamps then spritzed lightly with my Vintage Photo Glimmer Mist.  The button card is a stamp and die from PaperTrey Ink - stamped in Chocolate Chip and sponged with Vintage photo.  I added a couple of layers of crinoline cut with the Tim Holtz Tattered Florals die and dyed a plum color with some proprietary ink mixture I blended to make flowers for the shop (coming soon shabby crinoline flowers in autumn shades).  I topped that off with a scrap of seam binding from my stash that I think was left over from some purple dying I did last Halloween.  Then one of those cool floral buttons with some burlap string for a bow.  The stick pin is also from my Etsy shop.  

It was sort of a happy accident how all the colors came together and I really love how they compliment each other and make such a strong vintage look.  Now that I'm done rambling on, I hope you will hop over to Our Creative Corner to see what the other designers have to show this week.  Hope you will play along with our sketch challenge too.  

Wishing you a lovely weekend!  Thanks so much for stopping by and for all your lovely comments - I appreciate each and every one of them!!


Challenges Entered:
Sugar Creek Hollow - Buttons and Bows
The Pink Elephant - Stitching
Creative Card Crew - Handmade Flowers
Crazy4Challenges - BINGO - I chose the second row across - buttons, die cuts, flowers
Tuesday Taggers - Anything Goes
Creative Inspirations Wednesday Challenge - Your Favorite Stamp (yes, I just LOVE this set from PTI!)
Fab 'n Funky - A Stitch in Time

Friday, August 19, 2011

Free to a Good Home


Well, almost free that is - you pay shipping.  Here's the scoop.  My DH just retired and we are moving away from Miami just as fast as we can sell the house.  I have 20 years worth of accumulated treasures (another man's junk - LOL) and I can't move it all.  DH says we have to seriously downsize and while I plan to hold out for a decent sized craft room in the new place, I can't keep everything - especially if it is not being used.  So I'm going to start giving away and selling at low prices many craft supplies and tools.  This the first lot.

I have so much designer paper that is just sitting.  I'd love it to go to someone who will use it so I'm giving it away in 50 sheet lots - 12x12" sheets of mixed patterns and brands, some well known brands, and some generic from the local craft store.  Probably about 50% of it is from DCWV pads.  It will be very mixed - a few sheets from each pad or pack, even some Stampin' Up paper that I'm not using.

The postage should be under $10 for anything in the US.  If you are international, I'll ship if you pay the postage.  For everyone, I will box up your package, weigh it and charge you the actual postage plus $.75 to cover paypal fees.  I just need your email address.  I have at least 5 lots of 50, probably closer to 10 but haven't counted.  I'll distribute them on a first come, first served basis.  Just email me at thefunkiejunkie@gmail.com if you would like a box of designer paper.

And watch my blog - over the weekend I plan to start listing stamp sets for $3 to $5 a set plus shipping.  I will even take the rubber off the blocks for you so you can get many sets inside a flat rate priority shipping box.

Thanks so much for reading my blog posts!  Hope to see you back this weekend.

Sunday, August 14, 2011

What's Your Gilded Cage?


We all have one, don't we?  Some velvet leash that keeps us chained to "the finer things" but keeps us from breaking fee to be who we really should be?  That's the question that came to mind when I started brainstorming about the bling challenge this week at Simon Says Stamp and Show.  Coincidentally, I just (finally broke down and) purchased the TH Caged Bird die and was wondering how I could use it for this challenge.  Caged bird = gilded cage - lots of room for blinginess there, right?  I noodled this theme around all week before I started which lead to an examination of my own life and how sometimes I want to go for the glitter and glamor of "things" when it's really people, community and relationships that matter - and ART, have to add that in, right?  So how do we not get blinded by the flash of the bling?  For me, it's my grounding in my faith and continually questioning what it is that God wants from me.  That helps me break away from the pull of bling - my faith walk tells me he wants us to be concerned for the least of his people - the folks that the systems oppress. (If you are interested in lessening your dependence on material things, here are two great resource books:  How Much is Enough by Luthern pastor Arthur Simon and Affluenza by Degraaf, Wann and Naylor).

Okay, now that you got a glimpse into my heart, I'll get off my soapbox and move on to the real reason I am doing this post - yeah, the challenge at Simon Says Stamp and Show.  First off, I want to warmly welcome two very talented artists who are joining the design them this week - Ellen Vargo and Tracy Evans.  It's so exciting to have them joining us and they are sure to have some wonderful work to share in the months to come.  

This week our theme is all about the bling, baby.  Show us your bling.  We know you've got it so get it out and flaunt it!

This was a very involved piece.  I'm going to run through some of the steps because people tell me they like that. If you don't, just head over to your next bloggy stop.  I started with a piece of nice stiff cardboard, already folded with two like sized panels - perfect for the two lives comparison.  For the bling side, I took a sheet of designer paper and coated it with Claudine Helmuth Multi Medium Matte, then laid a layer of tissue paper over it.  It was dried with a heat tool and then run through the Moroccan Screen embossing folder (had to do that in three passes with my Cuttlebug).  Then I took my Encore metallic gold ink pad and rubbed it over the high spots.  (Oaky, I actually embossed the paper backwards which gives it a debossed effect that worked great here.)  I love the way it came out - very exotic looking.  A crystal flourish from Prima added a nice shot of bling.  I used a bunch of my jewelry making stash on it too - seemed a perfect fit.  

Over on the simple side, my gingham was too bright so I gave it a coat of a mixture of gesso  mixed with snow cap acrylic paint which toned it down nicely.  The gesso is a bit thick and fast drying for my taste and I basically thinned it with the acrylic ink.  All the sentiments were done on my computer, but I did stamp some flourishes and flowers on them over on the simple side.  The bird house was cut freehand from canvas and stamped with plaid and wood grain stamps.  I have to tell you I was influenced with my bird house by Suzanne from Suzz's Stamping Spot.  Check out her post from last week with her seriously wonderful birdhouse tags.  

The music score inside the birdhouse is from the Beyond the Sea set from Artistic Outpost.  My simple bird is decked out in stamped flourishes and hand doodled dots done with an Inkssentials White Opaque Pen.  Her embellies are limited to a paper flower, button and some very pedestrian plastic glitter.  That pretty much sums up this project, but if you have questions, please leave them in the comments or email me directly.  

We have an awesome project lineup this week over at Simon Says Stamp and Show and I hope you will pay us a visit.  Don't forget, our generous sponsor Simon Says Stamp has a $50 shopping spree for some lucky random player this week.  
Thanks so much for stopping by - wishing you a wonderful week!

Saturday, August 13, 2011

Fresh and Fruity

Hi there and happy Saturday to all my blogging friends.  A special welcome if you are a new follower - so glad you are here!  This week Kristin is our hostess again at Our Creative Corner with another fabulous inspiration photo and this week she's even letting us use what is in the photo - FRUIT!  When I think fruit stamps, I think Flourishes.  I just love their stamps, especially the fruit ones.  I bought this set two years ago and only used it once - what a shame.  Do you do that?  Have to have a set, use it once and then it collects dust :(  So I was very glad to be pushed into dusting this set off and having a bit of play time with it. 
Here is the inspiration photo Kristin gave us.  I also was inspired by this week's Mojo Monday sketch:
I had some fun making a somewhat less vintagy card than usual.  I just lightly ink distressed the paper edges - didn't even rip 'em up!  How restrained is that?  Don't know what got into me - LOL!  Maybe it was the colors I picked. 

So, you want to know what I used?  Here's the lowdown:
The designer paper is digital - gingham from Pink Petticoat and the dotted one is from Raspberry Road My Baby Love pack, with a twist.  It started out yellow with white dots and I changed the yellow to green with my PhotoShop Elements.  I love playing with digital paper - wish I had more time to experiment!  The card stock base is SU Garden Green and Basic Black.  For the scalloped bottom, I used a piece of the paper lace doily from my Etsy shop and just let a bit peek out at the bottom an at the top.   A piece of song book paper sponged with Vintage Photo and cut with a MS border punch embellishes the gingham panel.  I used Flourishes premium CS for coloring the image with Copics.

The sentiment is a stamp from Mark's Finest Papers/Speed the Cat's Designer Collection - Flourishes and frame set.  The itty bitty butterfly was cut with an SU die.  The crinoline and tulle were cut with my Tattered Florals die.  The crinoline was dyed with black Rit dye - a very messy and yucky task I must say.  (I will have more of these black shabby flowers as well as some fall jewel tones for sale very soon in the shop.)

Everything was tied together and finished off with a few buttons, jute string and ribbon from Flourishes - and another OCC make was in the can, or on the blog if you will.

Now it's time to turn your attention to something tutti fruiti.  Let's see what you got this week!

Thanks so much for stopping by - I so appreciate my followers and those who comment.   I'm coming up to 600 followers and am planning a small give-away so stay tuned over the next week!

Wishing you a wonderful summer weekend.  

Monday, August 8, 2011

If Friends Were Flowers...

I'm back and I'm making flowers!  Tim Holtz grunge style flowers, that is.  After yesterday's no flowers challenge, I was tempted to cover this piece with all kinds of handmade flowers, but I reined myself in and settled for one, plus I used the floral DP from Tim's Lost and Found Paper Stash.  What is it, you ask?  It could be a wall hanging or a piece of table art.  Haven't made up my mind yet - LOL!

Our challenge this week at Simon Says Stamp and Show is to Show Us a Tim Holtz technique.  I opened my Compendium of Curiosities to page 65 and made Tim's Grungepaper flowers, almost exactly as pictured.  I could have altered the paper, but I really liked the look of the ledger paper and text paper he used so I just CASed his flower.  The Grungepaper was cut with the Tattered Florals die and the leaves were cut from canvas with the Tattered Leaves die which I dyed in a puddle of ink and water I mushed around with containing a couple of drops of artichoke and vintage photo inks.  I wanted the leaves to be more brown and dried looking than green.  I muted the bright floral paper with a brushing of Snow Cap acrylic ink dabber.  The Hardware Findings and bookplate diecuts are chipboard covered with DP and ink distressed with Vintage Photo.  Same for the word Friends which was cut with the Vintage Market letters die.   If you are interested in seeing the detail up close, just click once on the photo.  Click a second time to really zoom in.  

The sentiments were done on my computer, lace and floral metals are from my stash.  I have to tell you I really struggled with this piece.  I think my mojo left for another week's vacation.  I just could not get inspired and felt like I had creative block.  I was almost late with my submission for this challenge.  Hope your next piece goes easier than this one was for me!  Hop on over to the Simon Says Stamp and Show challenge blog.  You are sure to get a great dose of inspiration from the other designers on the team!  What's your favorite Tim Holtz technique?  Hope you will show it to us this week!

Don't forget about the awesome prize that goes to a random participant each week - a $50 shopping spree provided by our awesome sponsor in their store Simon Says Stamp!
Thanks so much for stopping by and for all the lovely and encouraging comments.  I so appreciate all the comment and visits!

Saturday, August 6, 2011

Flowers FORBIDDEN!!

Look out!  Really tough challenge coming atcha this week from Our Creative Corner.  This week it's Kristin's turn to set the challenge and she set one that I seriously didn't think I could do.  And it's the first week too for our new designers.  This week we are welcoming Anne Marie Hile,  Marjie Kemper, Holly Kean and Tui Nathan.

Kristin showed us a yummy, lovely, colorful picture of gorgeous flowers to use for our inspiration and then she said we had to make a card with NO FLOWERS.  Oh, the pain.  Here's the photo - look at all the gorgeousness and I couldn't accompany my card with flowers anywhere - not on the DP and certainly not on the image - really - it's seriously difficult to totally eradicate flowers when designing a card.  Nonsense, I say, shouldn't be allowed - LOL!
But ever a challenge trooper, I dug in and went with the gorgeous rose pinks, yellows and a smattering of green.  And here is the result.  On a base of Barely Banana, I layered an embossed kraft CS sheet and then stitched down a lovely pink sheet of ancient stash Cosmo Cricket Hey Sugar DP.   That was followed up with three scallop layers using a PTI die and the two-year old MME Breaking Free series (polka dots) and Barely Banana.  I ran a piece of Jute Mesh Ribbon across the top of the scallops and then topped that off with seam binding dyed with Certainly Celery.  A sweet mini Kaft envelope from my shop is the mail focal item.  I embossed and ink distressed it and topped it off with a cap of doily that I sponged with Barely Banana. The sentiment is from Speedy the Cat's Designer Selection and the clothes pin and tiny filigree are also from my Etsy Shop.   The butterfly and rhinestones are the finishers for this card.

Whew, it was a job, but I finally produce

d a card that I was happy with for this inspiration challenge.  How about you?  Stop by the OCC challenge blog to get a dose of mojo and then see what you can come up with for this challenge.

Thanks so much for stopping by today and I thank you kindly for all the lovely compliments on my work.

Tuesday, August 2, 2011

A Little Advertising

I have added quite a few new items to my Etsy shop so if you haven't visited recently, you might want to do some window shopping.  You know I love unusual and funky embellishments for my art and I have spent a lot of time sourcing out various items to offer.  I've just returned from vacation and had a chance to list a number of the new items and had a chance to play with some of them myself.  Here's a card I made with several new items.  I love these tiny kraft sleeves.  They measure 2.25 by 3.6" and are fun to use on projects.  I stamped this one with a couple of Tim Holtz stamps and made a tag using a Spellbinders tag die to insert into it.  

I love twine but everything I have ever found was too thick.  So I have combed the internet looking for a thin twine that I would enjoy using.  I finally found this 2-ply natural jute twine and have it for sale in my shop too.  And you know I love metal!  I'm so happy to have found a large supply of these antiqued bronze filigree corners to be able to offer them in the shop too.  The very thin burlap string used with the button is also available in the shop.  I've really become addicted to that stuff!

There'll be more cool stuff coming over the next month too, so I hope you'll check back occasionally to see what I have to offer.  Most of the quantities are somewhat limited because I don't have big bucks to invest in large inventories, especially when I don't know what sells and what doesn't - LOL.  So if you see something you like, don't wait too long!

Thanks so much for stopping by!
Blog Widget by LinkWithin


I changed my font at thecutestblogontheblock.com