Monday, May 30, 2011

Funkie Junkie Paper Craft Kits


UPDATE:  These kits are currently sold out.  I am trying to obtain what I need to make a few more.  If you would like to reserve one, please email me at thefunkiejunkie@gmail.com.

It's been a busy weekend of crafting around my house.  Didn't get a chance to get out for any Memorial Day festivities, but we did barbecue twice - in between all my crafting, of course. Friday night I stayed up late to finish my Beautiful Baby card for Saturday's Our Creative Corner challenge and then Saturday was spent creating my desk art piece for the "Your Favorite Stamp" challenge over at Simon Says Stamp and Show.

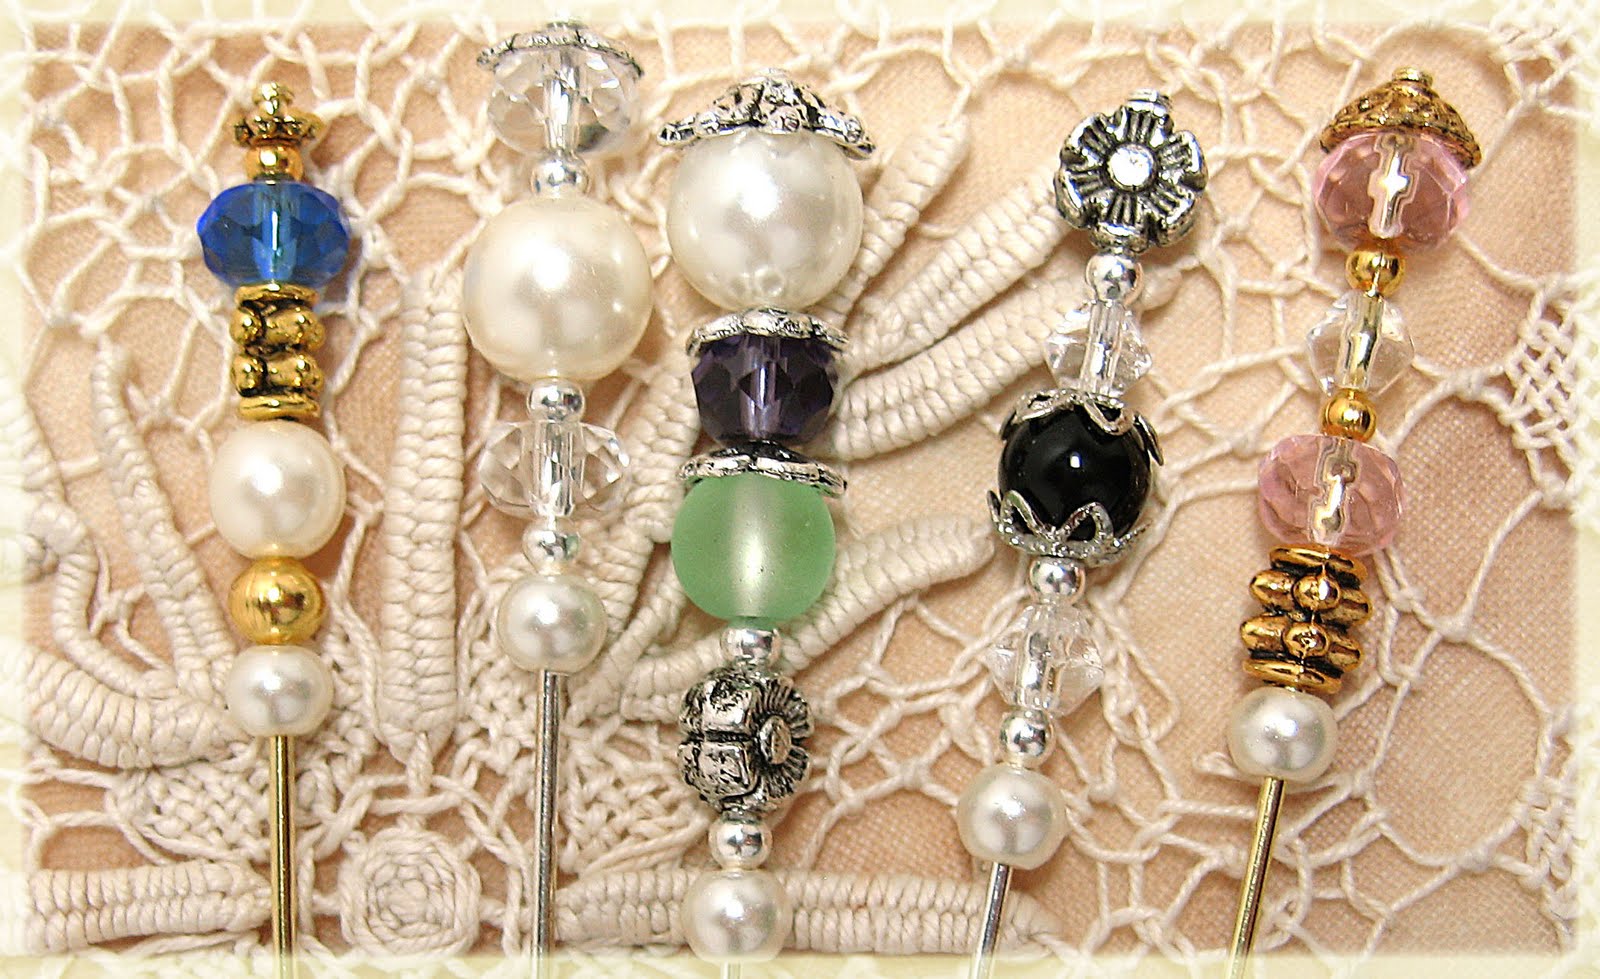
I had been waiting for orders of beads and metals to come in and the beads and one order of metal were here by Saturday.  So I spent Saturday evening and all day Sunday building stick pins. Whew, I was awash in beads, but so beautiful and lots of fun to play with.  I got them all loaded onto the Etsy site by Sunday night and also put a MicroMetals set on - very tiny pieces for embellishing your paper art.

Today, I finished up making some vintage style neutrals kits.  I had worked on the shabby flowers a week or so ago, but just had not had time to pull the kits together.  Today I did some hand dying of laces, cut the burlap and made the tags.  And just about 30 minutes ago, I listed these kits in my Etsy shop.  This kit turned out positively yummy.  If I didn't already have everything I think I would be compelled by my love of vintage to buy one - LOL!


Check out the stick pins too - soooo pretty.  I made them up in three different qualities - one set very inexpensive (sorry, temporarily sold out) for types of paper crafts that will have a short life, one nicer quality and one type that's very good quality.  I think either of the two better quality pins could also be used as jewelry items.  If you used them on a card, your recipient could then use it as a piece of jewelry - how fun is that?


Now that I've been shameless about enabling you, I'll wish you a wonderful week ahead!


My Favorite Stamp


That's the theme of our newest challenge over at Simon Says Stamp and Show.  And this is, at least my current favorite stamp. I think the whole design team wrestled with this one.  I mean, how on earth do you choose a favorite stamp?  It's like trying to choose your favorite child - LOL!!

Anyway, I do love this Tim Holtz Papillion set. I've used it several times already and keep coming back to it.  For this challenge, I made a little desk art piece.  It sits nicely on my desk.  I cut a 12" x 8" piece of cardboard and folded it down the middle for a 6"x8" "canvas".  The front panel was covered with card stock from Tim Holtz Kraft Resist Paper Stash and the back panel and inside panels were covered with a plain vanilla card stock.  A strip of Tissue Tape was run across the top to cover where it folded and the papers joined.  From an 8"x8" cream doily, I cut a diagonal pice and glued it down with Claudine Hellmuth Multi Medium Matte.  (I love that stuff because all of it that oozed out from the doily dried clear and you can't see it AT ALL).  Then I swiped some gesso across it and when dry stamped the weed stamp from the Flights of Fancy Set in Broken China that I misted before stamping. 

For the main butterfly panel, I cut a piece of watercolor paper and clear embossed the butterfly stamp, than ran Vintage Photo Distress Stain over it and roughed up the edges with scissors.  I happened to have a scrap of mocha dyed lace and a safety pin on my desk - humm, wonder what I can do with that?  Got it - out came the beads and two glass pearls and a clear crystal rondel fit perfectly.  The teal color was added with a Copic - gotta love that alcohol ink, you can alter almost anything with it!

I found that piece of beveled glass last week at the food pantry that I manage.  It was just laying around, must have come off something that was donated.  It didn't seem to belong to anything so it went into my pocket and also ended up on my desk.  It was the perfect piece for the butterfly specimen to be under glass.  See the itty bitty copper butterfly landed on the glass.  I loved the contrast of the butterfly under the glass and the one that was flying free.  It perfectly fit the freedom theme I had in the back of my mind.  

I had also stamped the text stamp from this set onto vellum, ripped it out and coated the back of it with Vintage Photo Distress Stain.  It promptly rolled up on its own.  So I tied a ribbon around it and it became my freedom document.  My chipboard heart was cut with a Spellbinders heart die, but it's actually several thin pieces of cardboard cut and then glued together because Spellbinders can't handle much thickness.  I made a little ruffle out of kraft paper twist for the heart, added some vintage snaps which I altered to black with alcohol ink and added the clear star rhinestones then altered them with a Copic. I used the "freedom" page from a vintage dictionary, photo copying it several times to use for the butterflies and Tim Holtz Vintage Market letters also.  The seam binding was hand dyed to match using Broken China distress ink.  

Oh, and that flowery trim at the bottom of the butterfly panel - someone gave it to me.  I have no idea what it is, but it worked great here.  I added the pearls with my Viva Pearl Pen.  

Well, that's it for another Simon Says Stamp and Show challenge.  Now it's up to you to stop by the challenge blog to see what the other design team members have been up to.  Week after week, they produce some amazing art.  And don't forget, our very generous sponsor, Simon Says Stamp, always gives a random winner a $50 shopping spree in their store.  So what's your favorite stamp?


Thanks so much for stopping by today.  And always, I so appreciate your comments and encouragement.  If you have any questions, please leave them in the comments section.  

Saturday, May 28, 2011

Beautiful Baby


 Good morning friends!  I hope you are all set for a wonderful weekend.  Happy Memorial Day weekend to my fellow Americans!  Thanks so much for coming by my blog today.  I have a "Beautiful Baby" card for you today - that's the challenge theme over at Our Creative Corner.  (Baby is also the theme at The Shabby Tea Room this week - one of my favorite challenge sites).  Sharon Wheet is our hostess and she wants to see baby cards, but not just any baby cards.  Your card must also have something in kraft, some sort of trim (lace, ribbon, etc.) and a button.  Now I didn't think I would have any trouble with those recipe ingredients, but I did struggle a bit.  I really wanted to use the straight doily from my Etsy shop because I thought it was perfect for a baby card.  But then I couldn't seem to work in the trim.  I was tempted to call the lace applique the trim, but finally decided to add a bit of lace to the bottom of the main image.  I hemmed and hawed - laid it on, took it off, laid it back on again and finally when I took it off again, it looked bare without it so out came the glue and when I laid it on again - it was with glue.

The dets:  Brocade Blue CS with old Creative Memories baby blue gingham.  I used a vintage nursery rhyme image from the Graphic Fairy.  I've had the image for a few months and have really been wanting to use it.  The library card stamp is from PTI and the Sweet One stamp is from SU.  I stamped it a second time, cut out Sweet One and popped it up.  Then I stamped it again on Barely Banana, cut out only the moon, glittered it and glued it to the original stamping.  The appliques, doily and lace are all from my Etsy shop. The heart applique is mounted on a scrap of kraft paper twist ribbon, also from my shop.  I'm finding that I'm reaching for that kraft paper twist a lot - adds a nice texture and warm color.  The lace comes in white and I tea dyed it with very weak tea this time.  The vintage image was cut with a PTI die.

Let me know if you have any questions.  Thanks so much for your comments and for stopping by today.  Wishing everyone a happy and safe weekend.

Oh, and anybody know what happened to all my followers?  They seem to have left en masse several days ago.  I've been hoping they would return, but no sign of them yet - LOL.  Looks like Blogger is having a little issue again.


Challenges:
The Shabby Tea Room - Sweet Baby

Monday, May 23, 2011

Simon Says Show Us Wendy Vecchi Style

Good morning and happy Monday!  It's time once again for another Simon Says Stamp and Show challenge.  This week we are celebrating the style of Wendy Vecchi/Studio 490. We want you to show us a project in that style.  I am sorry to say that I am a complete novice at Wendy Vecchi's style.  Her style, like mine, is very vintage, but whereas I would consider my style to be more Victorian, I guess I would consider Wendy's style to be more on the American primitive side.  I really like it - it's very cute and artsy, but it's not the direction in which I have developed my art.  So this week, the challenge really was a challenge for me.  Unfortunately, I forgot we had this challenge coming up and didn't order any of her stamps or Art Parts.  So I really was starting from square one!

I surfed around on Wendy's blog to get some ideas and learned that she likes polka dots and uses lots of patterned stamps to create her backgrounds.  So no designer paper this week - LOL.  Not wanting to dive into too deep water on this one, I opted to make a simple wall hanging out of a couple of coasters.  I used several Tim Holtz stamp sets including PapillonMini Classics and Curiosities.  The sentiment was created on my computer and the polka dots on the flower were drawn on with a marker due to lack of a polka dot stamp.  I did dig up an old polka dot stamp, but the dots were too little for the flower.  I used it on the flourish and also on the scrap of muslin that I tied onto the baker's twine.  Other products used include the Tim Holtz Tattered Florals DieGrunge PaperBroken China and Tea Dye Distress Inks as well as Vintage Photo Distress Stain

I enjoyed making this project.  It's fun to play around with different styles - kind of refreshing.  Plus it was nice that I got it done in about 3 hours as opposed to the 10-12 hours that I usually spend on my Simon Says projects.  I hope you will try your hand at a Wendy Vecchi style make this week.  I'm sure you are much better at it than I am!  And don't forget, our very generous sponsor Simon Says Stamp has a $50 shopping spree to randomly award to someone who plays with us this week.  

Thanks so much for stopping by today!  Wishing you a wonderful week.

Thursday, May 19, 2011

Etsy Shopping Spree Winners

Thank you all so much for your help in kicking off my new Etsy shop.  I truly appreciate how so many of you have posted on your blogs about my store and products.  And thank you to all those of you who have ordered.  I hope you enjoyed all the pretty new stash you have received!

We have three winners of $15 gift certificates.  I am pretty computer literate, but I just cannot copy that little random number generator gadget and paste it here.  (If someone can share the secret with me for the next time I need to do this, that would be great!).  So no proof - you're just going to have to trust me.  The lucky numbers were the entries from:

Candi from Alaska
Melody (lacyquilter)
Sharon (katydidit)

Congratulations ladies!  Please email me at thefunkiejunkie@gmail. com and I'll tell you how to claim your prize.  And thanks again to everyone who left me a comment with suggestions and accolades on the products.  I am touched and gratified by everyone's concern and help!

Wednesday, May 18, 2011

Pretty Packaging

 I've been so busy with my new Etsy shop that I haven't had a chance to make a card in the past few days.  So it seemed like I had no reason to blog.  But I had all these delicious little packages ready to go out to my new customers and they were so pretty that I thought I would share them with you.  Above are rolls of the paper doily strips from my shop all rolled and tied with my rose scrunched seam binding.  Below are cards of plain white rayon seam binding.  You know I'm hooked on dying my own so I have been offering it in it's original plain state so you can custom dye it to match your current project.
Heartfelt thanks to all my blogging friends who have helped me get the word out through my blog candy promotion.  It's helping - I've averaged a couple of orders each day this week, which is an increase over prior weeks.  I'll be doing the drawing late this evening and will announce the winners with a post on Thursday morning.

Hope you are having a great week!

Tuesday, May 17, 2011

Win a $15 Shopping Spree in My New Etsy Store

Post Edit:  PLEASE NOTE THIS CONTEST HAS BEEN EXTENDED THROUGH WEDNESDAY, MAY 18TH DUE TO ALL THE BLOGGER PROBLEMS THIS PAST WEEK.

It all started with the crinoline...people emailing me that they couldn't find it locally and how could they get some?  So I started selling it as a courtesy.  Then I saw some of the most delicious lace heart appliques on a blog and had to have them.

I had been thinking of trying to get a second part-time job as a check out clerk at our local supermarket to help with the family income when the idea of trying an Etsy shop came to me.  Now my shop is fully stocked but I need customers (thanks so much to those of you who have found your way there and ordered from me!).  I could use some help to spread the word.  Therefore, I'm kicking it off with a Grand Opening blog candy give-away.

I will randomly choose 3 winners from those who wish to participate in the drawing and they will each receive a $15 credit to shop in my Etsy store.  Here is how to qualify for the drawing:

  • Visit my store and leave me a comment on this post on what you like or don't like and why (constructive criticism is always appreciated)
  • Help me get the word out by putting my blog candy give-away on your blog's side bar.  Grab the code from my sidebar and install it as an HTML code on your side bar - it will automatically link back to my blog.  
  • You do not have to sign up as a follower here but I would love it of course and would also love it if you favorited my Etsy shop.  
This contest will be open through next Sunday, May 15th at 11:59 p.m. Eastern Time

Heartfelt thanks to anyone who is willing to help me with this promotion!

Monday, May 16, 2011

We're Talkin' Old Wives' Tales


We have such a fun challenge for you this week at Simon Says Stamp and Show!  We want you to make a project representing an old wives' tale.  If something doesn't come to mind, here is a great website listing and explaining many old wives' tales.  You have to stop by our challenge blog to see the cute projects my team mates have come up with for this challenge.

I had fun reading through a number of the tales.  There were several that I was considering when I came to the one about waiting an hour after eating before going in swimming.  It really cracked me up.  Honestly, my family lived by that one.  I grew up in a town on Lake Ontario and spent a lot of time at the lake as a kid.  I remember always having to wait that hour before I could swim.  As soon as I came across that one, I knew I had to use it as my theme.

I created a tag out of vanilla card stock and ran it through the Cracked Embossing folder, then ink distressed it with Antique Linen DI.  I tore several shades of blue paper to created waves and rubbed a little Snowcap acrylic paint dabber across to look like foam, used two images from the internet, the bathing beauties and the This Way to the Beach sign, and created my own little sign warning people to wait that magic hour after eating before swimming.  I made a very simple embellishment with corrugated cardboard cut with the Tattered Florals die and edged with Vintage Photo  DI, rubbed with gesso and topped with a  Foliage hardware piece and a button, then finished it off with a stamp from the Odds and Ends set.

What's your favorite old wives' tale?  Show us what it is by making an art piece and entering it at Simon Says Stamp and Show this week.  You must might win that $50 gift certificate that our amazing sponsor Simon Says Stamp gives away on the blog each and every week.


Thanks so much for stopping by today.  I love to hear from each and every one of you so don't be shy!

Sunday, May 15, 2011

Pay It Forward


Have you heard of the sweet project called Pay it Forward?  It's something so simple yet overflowing with inspiration, generosity and delight.  I recently discovered it while visiting my friend Abby's blog and was amazingly fortunate to comment in time to be one of the recipients of her dazzling shabby work.  Here is the lovely handmade sachet she gifted me with.  

So you are probably wondering what this is all about.  It's really quite simple.  The first five people to comment on this post will receive a handmade gift from me.  It will be some of my vintage/shabby chic work, projects that I already have made or will make in the next few weeks.  

In return, you must also post about Pay It Forward and send a handmade gift to the first five visitors who comment on your post.  Isn't this a most wonderful way to connect with our crafting sisters in blogland?

You can take your time.  They don't all have to be sent today or tomorrow.  It's not the size or value of the gift, but the lovely spirit of Pay it Forward.  And just a little way for me to show my heartfelt gratitude for all the amazing readers and to those who leave such lovely and encouraging comments!


Saturday, May 14, 2011

Au Naturel With a Twist

Good morning and welcome to my weekly Saturday post for Our Creative Corner.
 This week, I'm the hostess and my challenge to you is Au Naturel with a Twist.  Here's the deal.  I want to see projects created using only neutrals (and gold/silver or metallics).  The main project must use only pale neutrals (ivory, white, beige, tan, gray) with darker neutrals (dark gray, brown, black) as accents only.  The twist is to include lace and buttons.  

Here's my sample.  I started by stamping with Vintage Photo distress ink onto Very Vanilla using the large text stamp in Tim Holtz's Papillon set, the butterfly stamp and the small flourish in the Fabulous Flourishes set.  Then I brushed gueso over the entire panel.  I used a page from my vintage songbook and punched it with a Fiskar's boarder punch.  Then I made a ruffle out of the kraft paper twist that I'm selling in my Etsy Store.  I did it by cutting two pieces from the short side and then gluing them in just one place end to end.  I created the sentiment on my computer, the first part printed on vellum.  I inked the back of it with Vintage Photo distress ink and cut it out freehand with my pinking sheers.  The SOAR piece was also computer generated.  I punched it with an SU punch and sprinkled gold and UTEE around the edge and heat embossed.  This sweet piece has been embellished with seam binding (dyed with Creamy Caramel) and two sweet Venice Lace butterflies.  The stick pin is also from my Etsy Store.  

That's it for another Saturday at Our Creative Corner.  Please do stop by the site and check out what the other designers have done for this challenge.  

Wednesday, May 11, 2011

What's On Your Workdesk Wednesday?

Okay, this is my first time to share my messy little cave.  When I first heard about this What's on Your Work Desk Wednesday sharing post, I thought no way can I ever let people see how messy I am.  But then I noticed that others have stacks and piles and bits and pieces.  I really was interested to see how similar many desks look to mine.  I don't take time to tidy up every day.  I usually fall into bed sometime after midnight and then get right down to the business of crafting (or blogging) the next minute I have available.  So here is a little snippet of my world.  I spent last night dying and painting laces for my new Etsy shop.  I fun and relaxing activity even if it is terribly time consuming.

My good friend Stasia just sent me this wonderful quote that I wanted to pass along:

There is a vitality, a life force, an energy, a quickening that is translated through you into action, and because there is only one of you in all of time, this expression is unique. And if you block it, it will never exist through any other medium and it will be lost. The world will not have it. It is not your business to determine how good it is nor how valuable nor how it compares with other expressions. It is your business to keep it yours clearly and directly, to keep the channel open. You do not even have to believe in yourself or your work. You have to keep yourself open and aware to the urges that motivate you. Keep the channel open. ... No artist is pleased. [There is] no satisfaction whatever at any time. There is only a queer divine dissatisfaction, a blessed unrest that keeps us marching and makes us more alive than the others." 
from The Life and Work of Martha Graham

Wishing you all a wonderful Wednesday.

Monday, May 9, 2011

A Pretty Pink Tribute to Mom


Good morning and welcome to my Monday post for the vintage Simon Says Stamp and Show challenge blog.  This week we have an Anything Goes challenge for you so you have NO EXCUSE not to play along with us - unless you don't care for vintage, that is!  

Since I could do anything this week and it was Mother's Day, I decided to make something pretty and girly for a mom.  You can bet that with all the pinks and the flowers and fabrics that I had a wonderful time working on this piece!  For this one, I used the inside of a book cover and stamped a bunch of vintage stamps randomly in Vintage Photo Distress Ink.  The various stamps were from the Tim Holtz Curiosities and Papillon sets as well as the Tim Holtz Sequence numbers stamp and Hero Arts French Post.  The vintage woman on the Journaling Ticket is from the Artistic Outpost Paris Exposition set.  

I found the cute tin heart in some old cross stitch supplies that I discovered at the back of my closet - a lovely surprise, I must say!  I gave it a couple of coats of Claudine Helmuth Gesso and then rubbed the edges with Vintage Photo Distress Ink once the gesso was dry.  The crinoline and burlap flowers were cut with the Tim Holtz Tattered Florals Die die as was the enameled rose.  I used a Spellbinders die to cut the flourish on the top of the tin heart, which was also painted with Snow Cap Crackle Paint and when dry, brushed with a bit of watered down pink ink and the again with watered down Vintage Photo Distress Stain.  

Full disclosure here - the Love You Forever banner, pink enameled heart and pink enameled rose were taken off a tag I made at Valentine's day.  It was hanging on my wall right in front of my nose when I was making this.  I looked up and thought how perfect they would be on this piece.  I was a tad pressed for time and didn't want to spend the extra hour to recreate them so I cannibalized them off the tag.  They were all made with several coats of Clear UTEE - very cool stuff!  I also had a scrap of the Francis Vintage Crepe Paper I used on last week's project still floating around on my desk, so that went across the top for a ruffle.  

That about covers it for this one.  Fun, fun, fun!  So why don't you join us?  Our ever generous sponsor has another $50 shopping spree in their Simon Says Stamp store.  And be sure to stop by the Simon Says Stamp and Show blog to see what my team mates were up to this week - amazing work that's sure to inspire you!

Thanks so much for stopping by and for your lovely comments.  I wish you a blessed week!
www.simonsaysstamp.com

Saturday, May 7, 2011

Sweet Hearts


Jennifer Rzasa has a great challenge for us this week at Our Creative Corner.  It's called The Wonder of Weaving.  And after making my DT sample, I have to say that I love it -  it is a Wonder-ful challenge.  When I read what the challenge was, I wasn't red hot about it because I didn't have a clue what I could do for the challenge.  As I mulled it over throughout the week, I started thinking about die cutting a block of woven paper.   Ideas started to flow and I visualized a woven block of cream colored paper, distressed along the edge and sponged with my favorite Creamy Caramel ink.  So that's what I did.  The paper is Confetti White, cut in strips and distressed/sponged along both sides (I wish I had made the strips a little more ragged).  I stamped an itty bitty flower in red on every other square and then dabbed a bit of heat embossed gold/UTEE mixture along the edges.  The DP is from Raspberry Road (and I didn't even digitally alter it) and the other CS is SU - Mellow Moss and Chocolate Chip.  

I embellished it up with several products that I am selling in my Etsy shop.  The filigree metal (isn't it wonderful?), the new Venise heart lace (which comes in white, but that I tea dyed) and the sweet little rosebud appliques.  I will have more lovelies coming on line over at my Etsy shop before the end of the weekend.  I think the ruffled gingham ribbon came from Flourishes.   

That's it for the dets on this one.  Now please hop on over to Our Creative Corner and see the rest of the weaving projects the DT has created to get your mojo revved up for this one.

Paper Play Challenges - Show Us Your Style (vintage/shabby chic)
Paper Romance - Use Your Favorite Die
Raise the Bar - Flower Power
Crazy4Challenges - April Showers Bring May Flowers
Flourishes Bring Back Beautiful - The Beauty of a Flower

Tuesday, May 3, 2011

For Mom


Just a quick share of the card I made for my mom for Mother's Day. I seriously had the wrong date in my head for Mother's Day this year and thought it was still more than two weeks away.  When I realized my confusion, I scrambled to get a card made and mailed to my mom so she would have it in time for Mother's Day.  So I just finished it and it will go out in the mail on Wednesday.  She should have it by Saturday. 

I want to say thank you and give a big shout out to Julie and the wonderful people at Verve and Mojo Monday.  My card was chosen as one of the winners last month and I got to pick any Verve stamp set I wanted.  I settled on the Because of You set and just inked it up for the first time on this card.  Isn't it wonderful?  I love the images and the sentiments and word stamps are fantastic too.  


I used the sketch from this week's Mojo Monday and the color challenge from The Shabby Tea room to make this card.  The pretty Venise lace floral applique is from my new Etsy shop which I tea dyed and then painted with Bordering Blue to match the designer paper.  Other products used were Spellbinders dies and an SU boarder punch, Bordering Blue in and my Viva Decor pearl pen.  

Thanks so much for stopping by and if you are curious about anything, just ask.


Challenges Entered:
Mojo Monday - Sketch
The Shabby Tea Room - Photo Inspiration and colors Blue, White (or cream) and a Neutral (Brown, Black, Kraft or Tan)
Sentmental Sundays - For Those Special Women in Your Life
Stamptacular Sunday - Mum's The Word
Papertake Weekly - Anything Goes
Try it On Tuesday - Something Old, Something New (my old - eyelets, pearl from the Pretties Kit, last year's DP - my new - rand new Verve stamp set)
Tuesday Throwdown - Mother's Day
Little Red Wagon - For Mom
Scrap, Stamp and Doodle - Mother's Day
Flourishes Bring Back Beautiful - The Beauty of a Flower
One Stop Craft Challenge - Stitching

Monday, May 2, 2011

A Lady's Hands

Here I am back again for another Simon Says Stamp and Show challenge.  The challenge this week is to show us Something With Hands.  Probably many times we when first hear of a challenge, something just pops into our heads (and yes, sometimes I struggle too, coming up empty until the last moment).  That's how this challenge hit me.  Something with hands...all I could think of was a woman's hands and how strong and capable they are, but soft and gentle too like a lady's hands should be.  While poking around in an antique shop recently I came upon a bag of women's gloves.  Now I have to tell you, I am old enough to remember my mother wearing gloves back in the 50's.  Heck I even wore them to church which I was little. I saw the gloves before I read what our challenge was this week and when I started thinking about a woman's hands, I remembered the gloves and headed straight back to that store.  I also picked up a vintage pie tin (not a disposable aluminum one) at the same time, thinking I could make something out of it.  So I did.  I made this wall hanging.

I first covered the rim with Tim Holtz Tissue Tape and rubbed a bit of Vintage Photo distress ink over it. Then I broke into my highly-prized stash of Melissa Frances vintage crepe paper.  I am having a wonderful time working with that stuff - so fun! I cut about a 3 inch wide strip of the white, ran a basting stitch down the middle, gathered it and then folded it along the stitch line so it was a double frill. Then glued it around the inside edge.  The circle chipboard piece I was working with  didn't quite fill the space, so I then created a single gathered ruffle of the blue.  That filled the gap.  The chipboard circle was covered with some Tim Holtz Paper Stash Vintage Shabby paper.  I was going for lots of ruffles and frills so had to run a circle of lace around it too.  The image is printed on cardstock edged with Vintage Photo distress Ink and then stitched to a piece of vintage muslin.  I mounted the vellum sentiment on scraps of muslin too.  A crinoline and paper flower tops off the upper portion.  I draped the sweet glove across the bottom, finished off with a stick pin and another handmade flower.  In the making of this piece, I also used plenty of Claudine Hellmuth Multi-Medium Matte.

Okay, that's it for the details.  Now, I really want to know your opinion.  PLEASE don't say you like it if you don't.  I know you are all sweet and polite and want to say nice things about everyone's work.  If you like it, leave a comment.  If you don't, you can give me some constructive criticism or just don't leave a comment.  LOL - if I get no comments, I'll know that it didn't make the grade.
Now, please head over to Simon Says Stamp and Show to see what the rest of my more talented team mates whipped up to inspire you to Show Us Something With Hands. I hope you will join in our fun this week.  Who knows, you might just win the $50 random prize drawing for a trip to the Simon Says Stamp on-line store.   Our generous sponsor is giving one away again this week to one of our players.

That's it for me.  Hope you all had a wonderful weekend and will have a terrific week.  Thanks so much for stopping by today!

Sunday, May 1, 2011

Removing the Background of Images

I'm happy to know that people actually read my posts and don't just look at the photos.  I know that because I get inquiries and requests for a tutorial every time I talk about removing the background of the vintage images I use so I can layer them over other images.  Here is an example of the image I used on the card I shared yesterday.


The first image is the way I received it (downloaded from a free vintage graphic sharing site but unfortunately I don't know which one).  I wanted to use it layered over some digital designer paper I had and I didn't want it to look like a square block sitting on the paper.  Using the Magic Extractor in PhotoShop Elements, I removed all the background leaving only the image itself.  And rather than reinvent the wheel, here is a tutorial I found on the web that tells exactly how to do it.  I will tell you it is a little fussy and time consuming.  It's not quite as clean and easy as the tutorial shows.  After I used the Magic Extractor, there were still areas that I removed by using the eraser in the main edit panel.  You can enlarge the view and make your eraser point very small to get into all the small areas that the Magic Extractor didn't removed.  It took me around 20 minutes to do the complete job.  I don't mind because I am a slow fussy crafter.  Plus I enjoy messing around with digital stuff to stretch my art.  Once I had the background removed, I opened my digital paper, layered this image over it and then reduced the opacity to give it a faded look.  You will need to save the image as a .png file so it has a clear background.

Hope this helps those of you who are interested in this process.  If you have any questions, let me know. I am definitely not a PSE expert, never taken a class.  Everything I know has been learned with the help of tutorials such as the link I shared above and my trusty PhotoShop Elements for Dummies book.

Blog Widget by LinkWithin


I changed my font at thecutestblogontheblock.com