Monday, February 28, 2011

My Vintage Shoebox

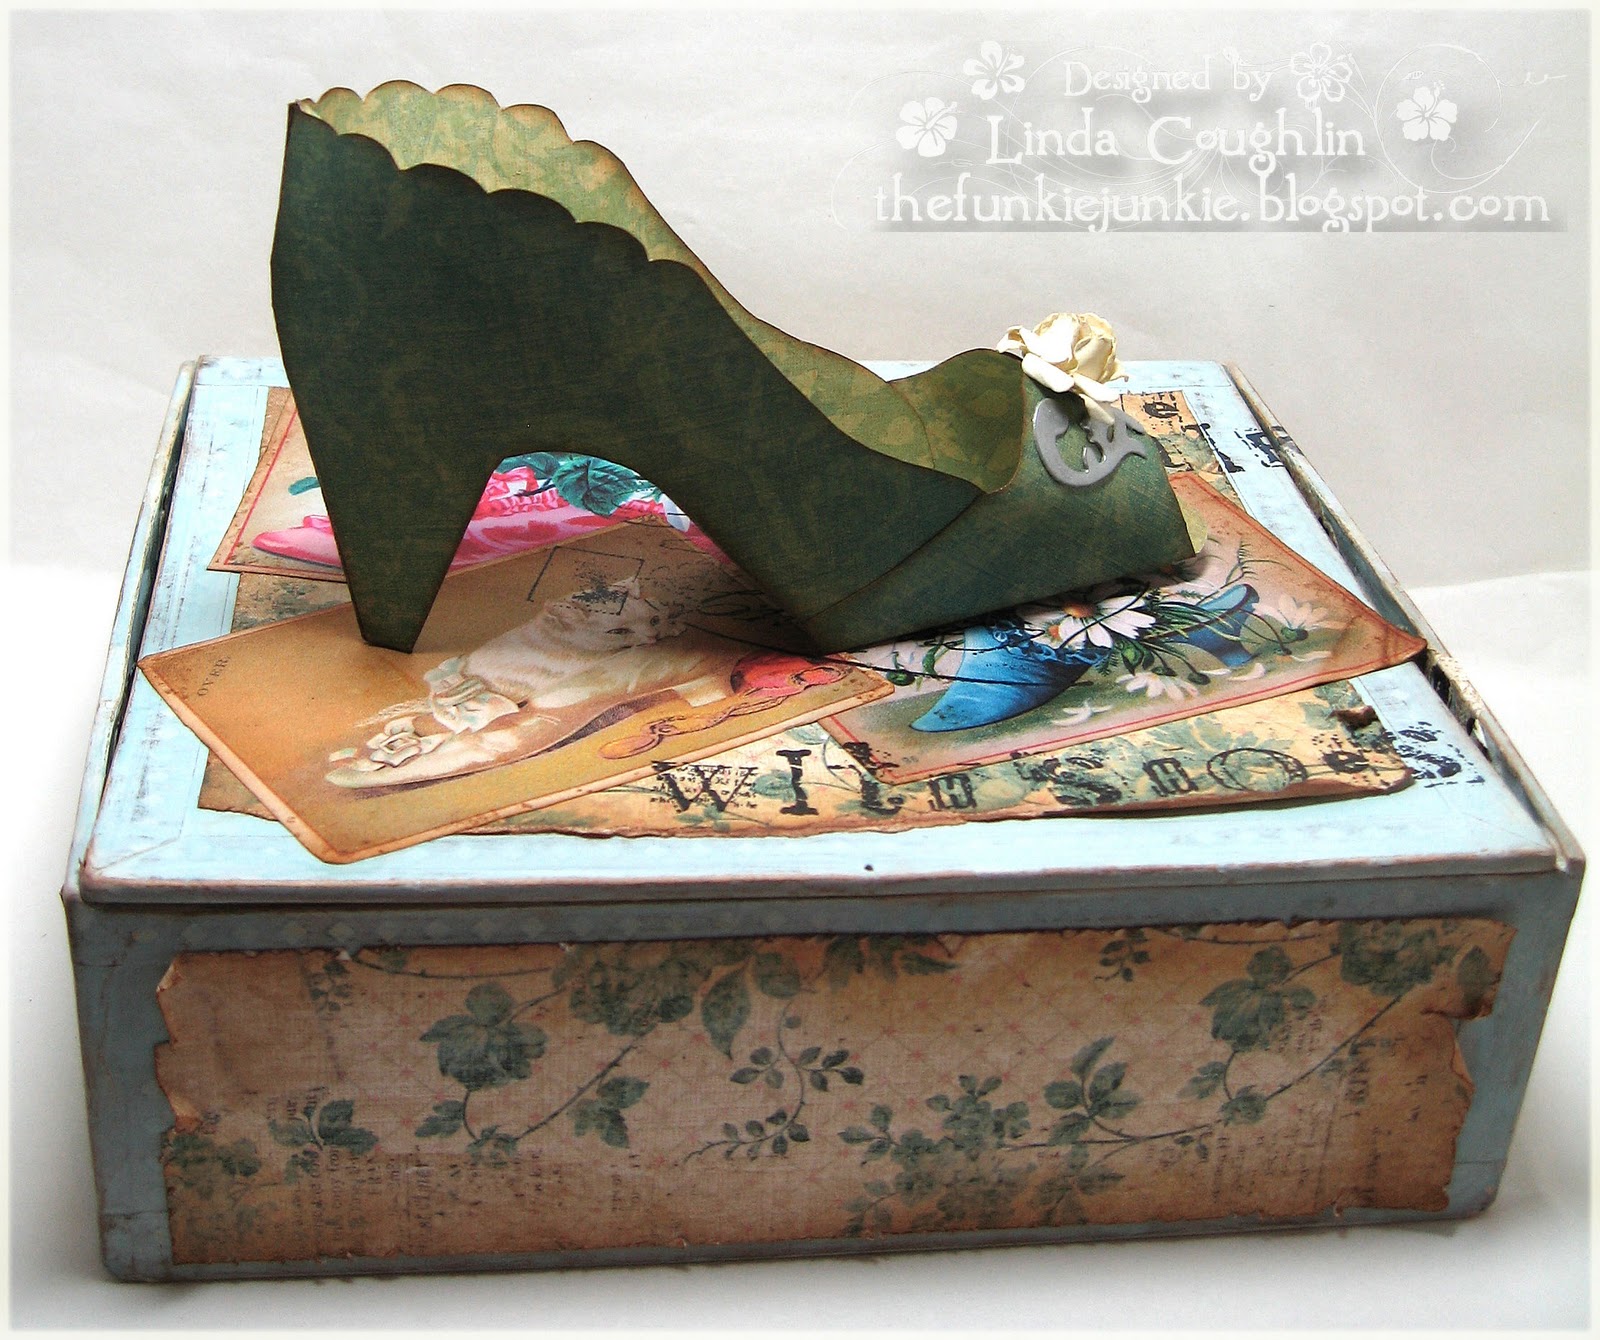
Good morning and welcome to my marvelous Monday post for Simon Says Stamp and Show.  This week, we are asking you to show us some ephemera.  Vintage ephemera is close to my heart and I use it constantly in my art.  For this project, I wanted to do something over and above my norm.  I finally settled on the idea of altering a cigar box that I have had sitting around for ages.  One of my favorite forms of ephemera is vintage advertisements and I love shoes so this project became a personal expresison.  I was able to find several great vintage shoe ads through my free on-line sources (see my sidebar for my favorite vintage clip art sites).  
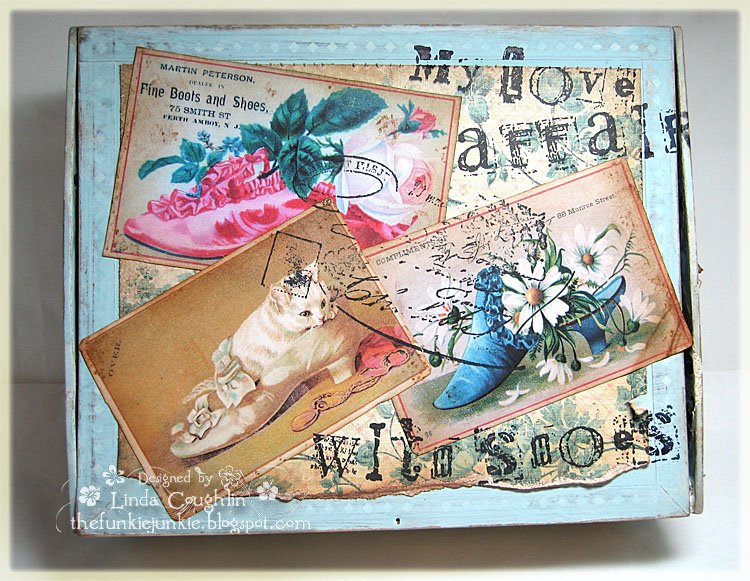
I've never done a project like this so I had to feel my way through it.  I don't even know if I have broken any cardinal rules of mixed media art, but here is what I did.  I first painted the entire cigar box, inside and out with gesso.  When dry, I gave it another coat, this time with Adirondack acrylic paint.   I used Snow Cap and mixed in several drops of reinkers to get a shade of blue that I liked.  When the paint was dry, I lightly sanded all the edges and ink distressed them with Vintage Photo Distress Ink.  Next I distressed some designer paper with scissors and Vintage Photo Distress Ink and adhered them with Claudine Hellmuth Multi-Medium Matte, then did the same with the clip art. "My Love Affair With Shoes" plus the Hero Arts French Post stamp were then stamped on the cover.  
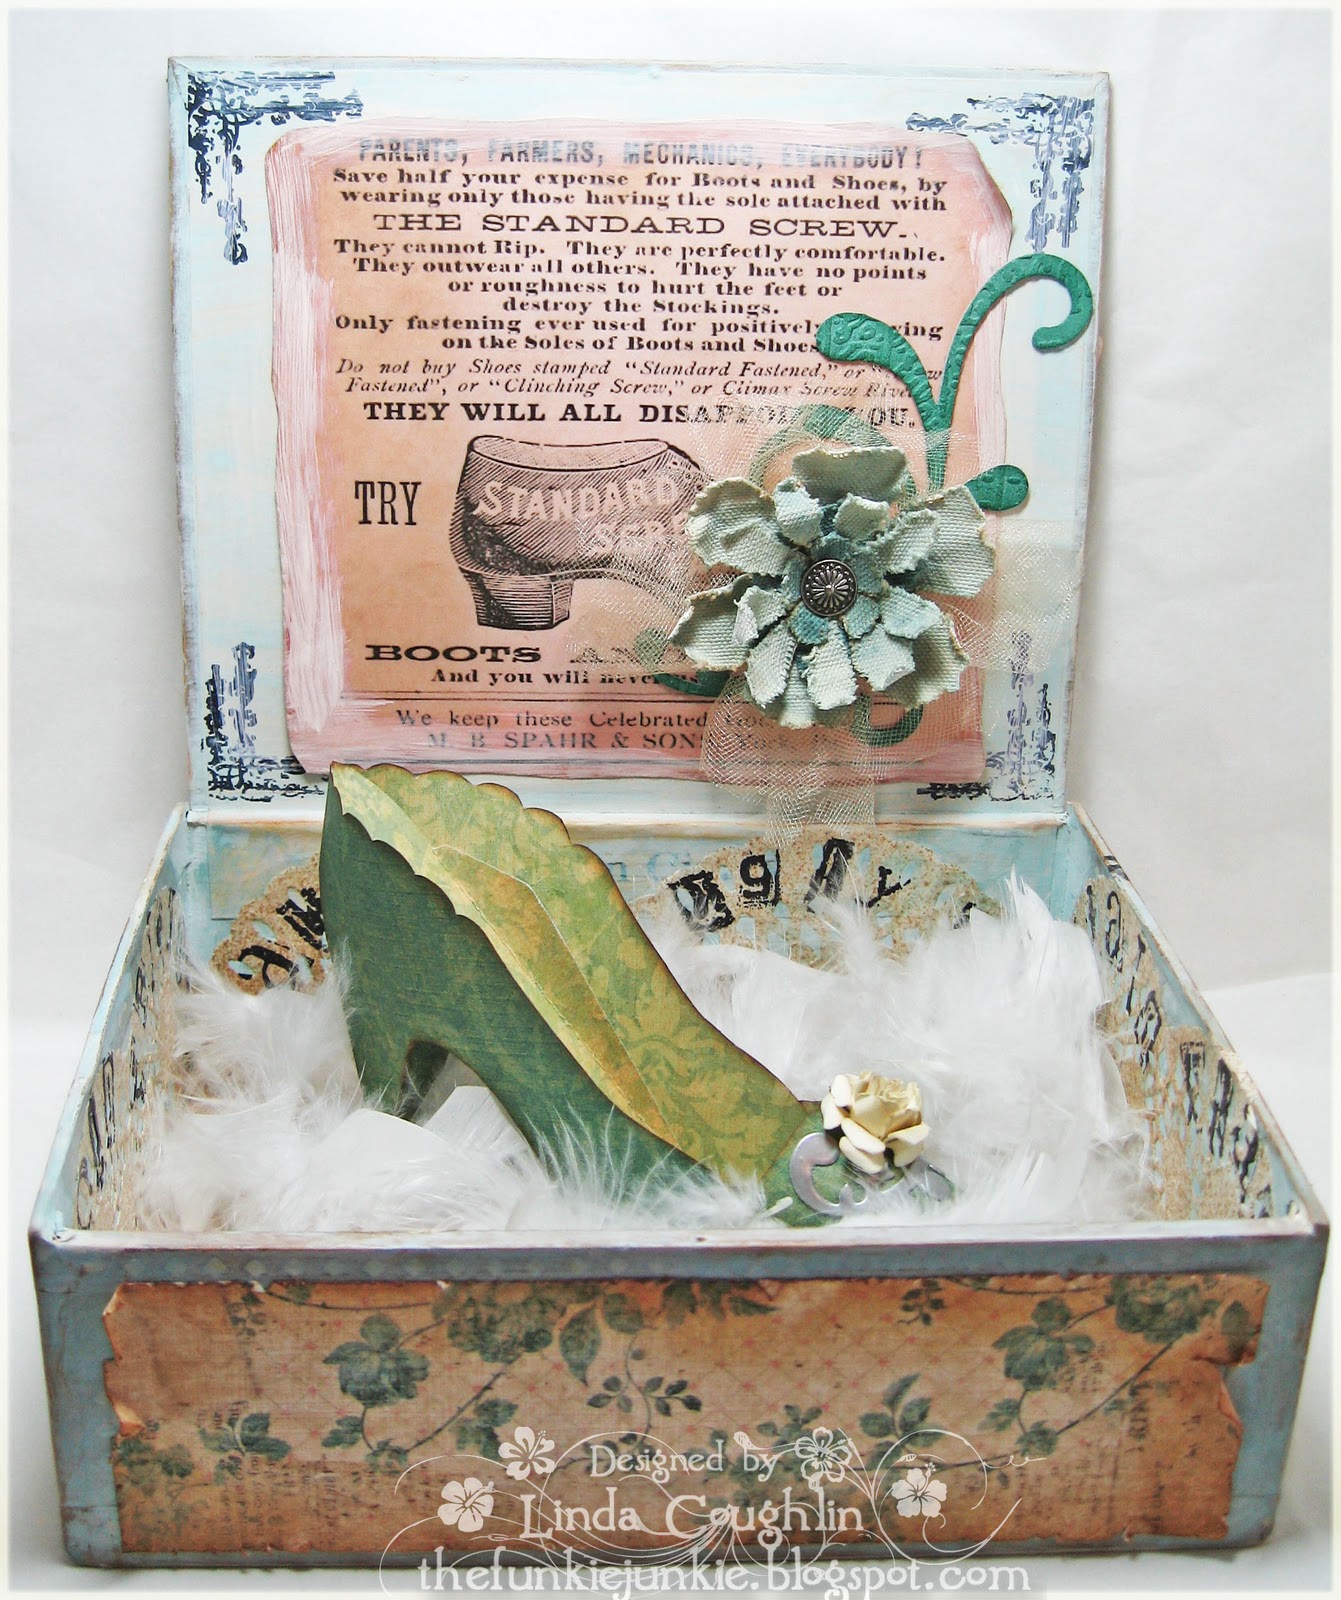
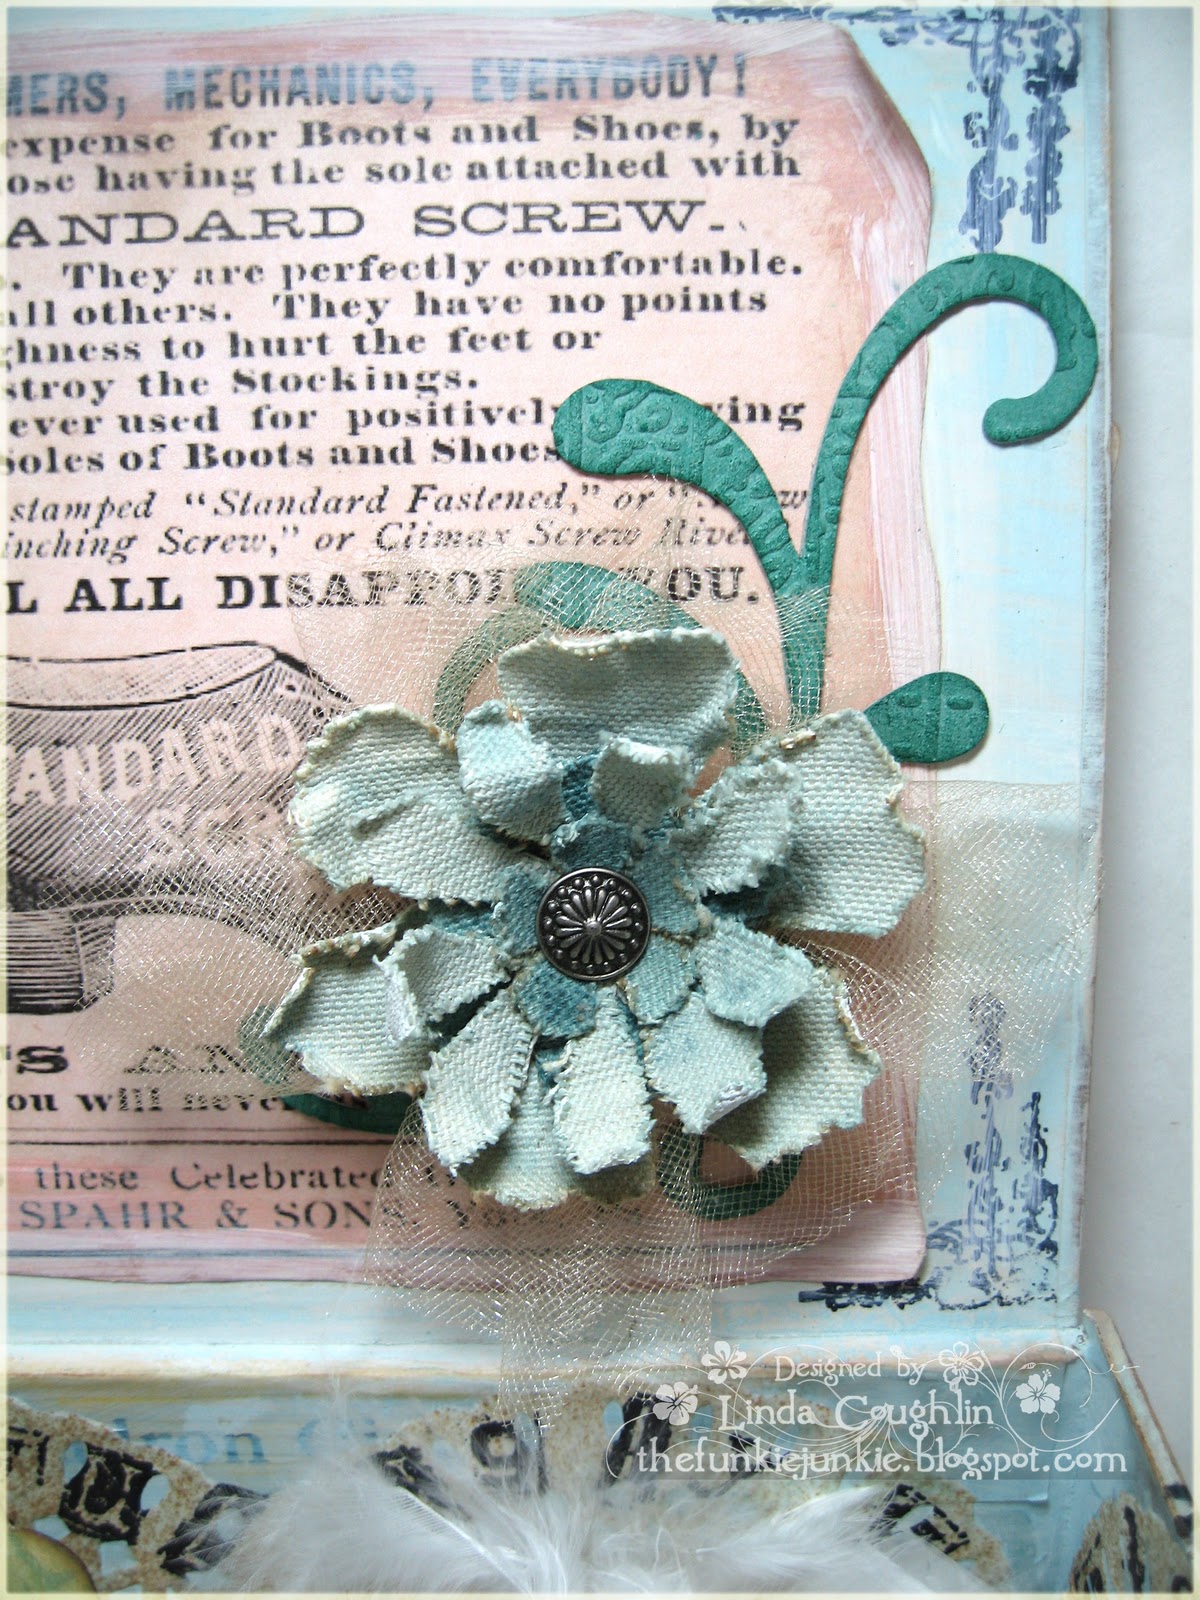
On the inside lid, I stamped a corner flourish from Tim Holtz's Mini Classics in Ranger Jet Black Archival Ink, adhered a vintage shoe advertising poster and did a little distress painting with the Snow Cap paint dabber.  A flourish was cut from Grungeboard, embossed with the Collage texture fade and inked with Pine Needles Distress Ink.  The flower was made from canvas cut with the Tim Holtz Tattered Florals Die (of course). 
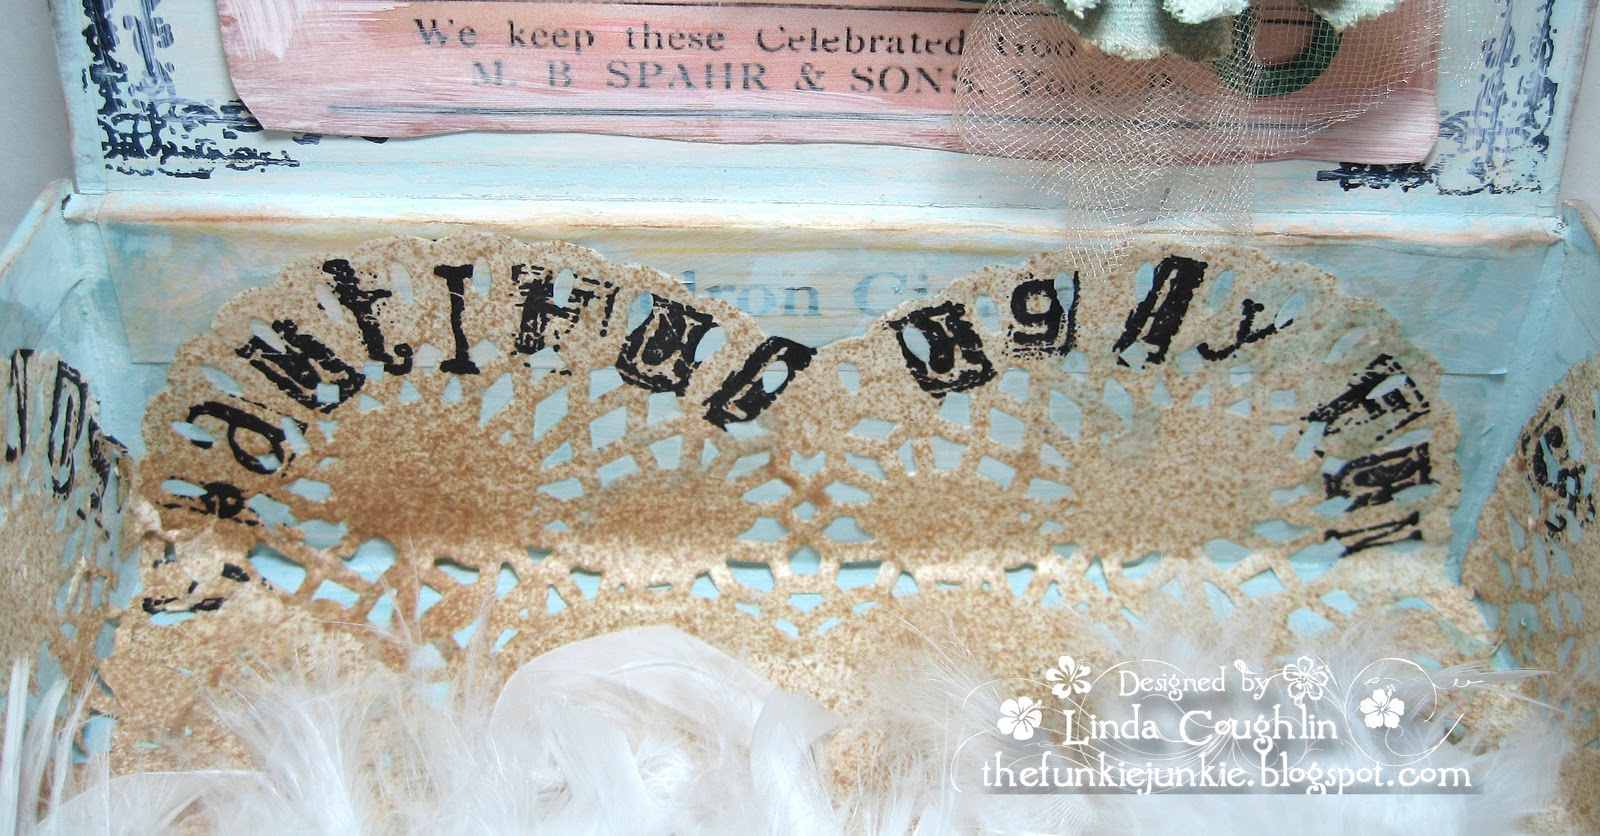
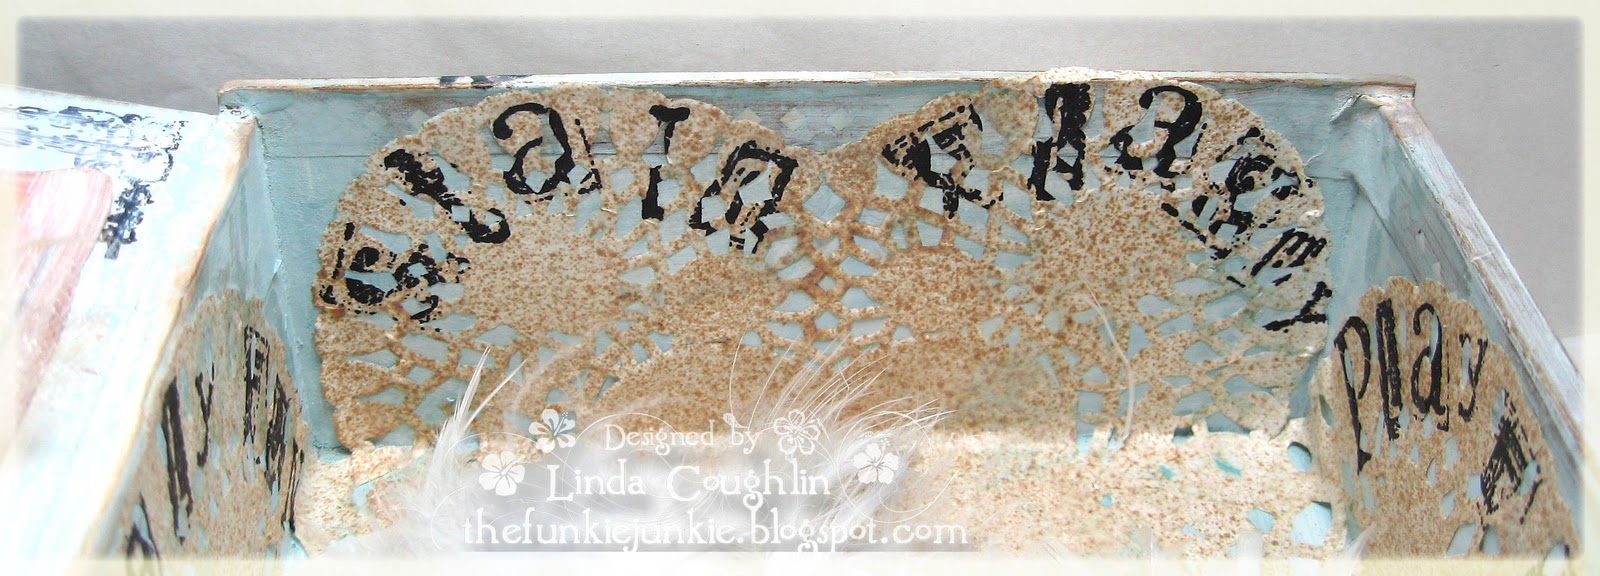
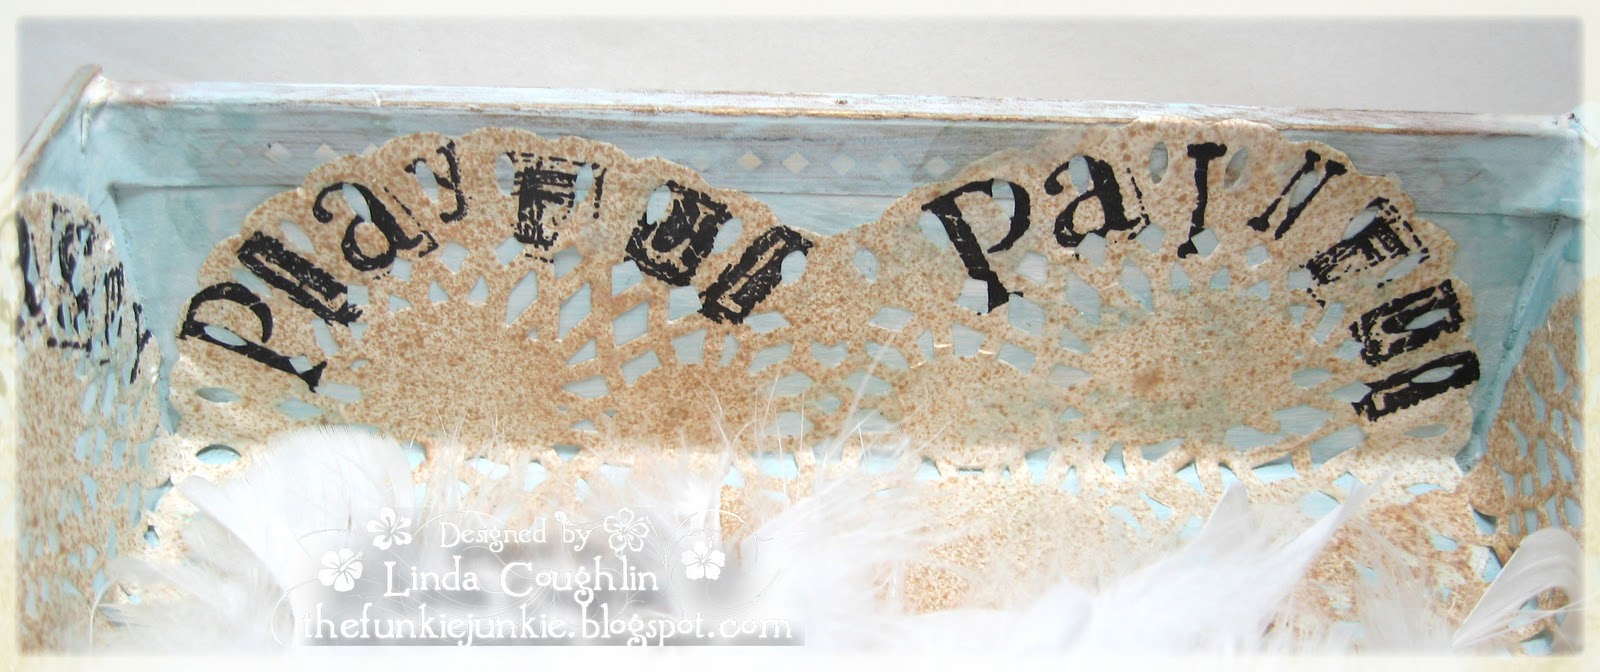
For the inside bottom, I took four heart doilies (2 large and 2 small) and misted them with my homemade glimmer mist.  When dry, I stamped words describing shoes along the scalloped tops so the words ring the entire inside.  The collage alphabet stamp set is hard to read, especially when stamped on the doilies so here are the words that were stamped:  beautiful, ugly, fun, staid, flashy, playful, painful, old friends.  
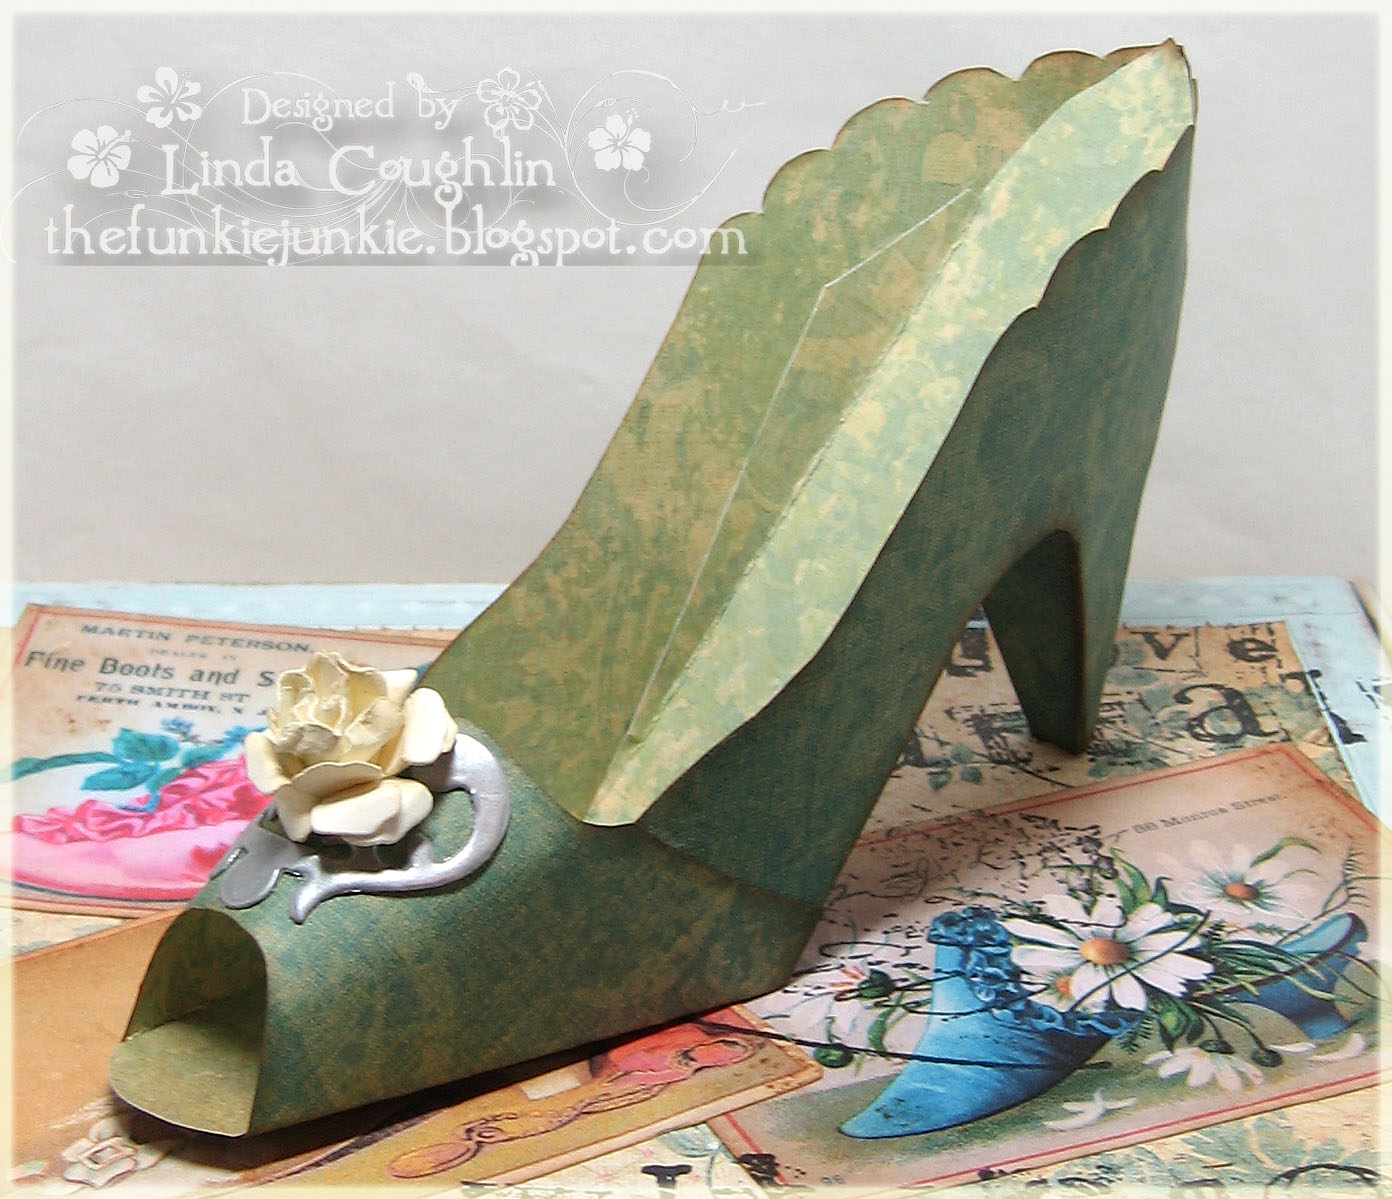
And what would a shoebox be without a shoe?  I found a shoe template on line and made a sweet paper shoe. It has a silver "buckle" on the front made from a Spellbinders die and a little cream rose made with the smallest flower in the Tim Holtz Tattered Floral Die.  NOTE:  I just realized in looking at the one I copied, that I made a small mistake which you can see in top photo - the connecting flap inside should have been flipped DOWN not up before glueing - oh well, live and learn. 
So there you have it.  This project took up my entire Saturday from the time I got up until late evening.  My DH was away for the weekend and I had no other calls on my time so I just poured it on continuously energized by the artistic drive to see this project realized and by a generous supply of coffee.  It was really a fun experience to be so captivated by creating that I barely noticed the time going by.  
Now it's time to hurry on over to Simon Says Stamp and Show to check out the rest of the ephemera projects created by my talented colleagues.   Again this week, our ever generous sponsor Simon Says Stamp is offering a $50 to a lucky randomly selected winner.  You can't win if you don't play so get in gear and make an ephemera project to share with us this week.  

Saturday, February 26, 2011

Gently Distressed

Thanks for stopping by today to view my sample for the weekly Our Creative Corner challenge.  We have a relaxing challenge for you this week.  At least we hope you will be relaxed when you finish your project for our challenge.  Our host, Sarah Gough, challenged us to De-stress by Distressing our card that we made following the OCC sketch.  You know, I almost always scissor distress my edges, right?  Do you believe I didn't do that for this challenge?  Yikes, I was so into the sketch that I forgot all about the distressing requirement.  Fortunately I always ink distress my edges so that allowed the card to meet the challenge requirements.  I almost ripped it apart and started on it with my scissors, but my team mates weighed in and nixed that.  So here is my very gently distressed card.
I saw the previews of this new Button Boutique stamp set by Papertrey Inc. and absolutely had to have it.  The website said it was being released on February 15th, so I checked the site at 12:00 a.m. on the 15th and sure enough it was there for purchase.  So I splurged and bought the stamp set and three coordinating dies.  I think I will be able to get quite a bit of use out of this sweet vintage set.

The Dets:
Paper:  Very Vanilla, MME Bella Bella and polka dot by Pink Petticoat, adjusted the color in PhotoShop Elements so it coordinated with the MME paper.  The coordinating solid colored mat was created on PhotoShop Elements also to match the MME paper.
Stamps:  Button Boutique and Birthday Basics from Papertrey Ink
Ink:  Blue Bayou, Antique Linen distress ink
Accessories:  Creative Memories corner rounder, lace doily cut with a Spellbinders' Scallop die, lace, ribbon and chipboard buttons made with Papertrey dies Buttoned Up 1 & 2 (scroll down to the bottomof the page)

That's it on the details.  Let me know if you have any questions.  Love hearing from you all and thank you so so much for continuing to support me.  I hope to see your beautiful distressed card following our sketch over on the challenge blog this week!

Challenges Entered:
The Shabby Tea Room -  Buttons and Bows
The Pink Elephant - Buttons, Lace, Ribbon
Flourishes Timeless Tuesday - Birthday
Stampin' for the Weekend - Monochrome
Rainbow Lady's Challenge - Shabby Chic

Friday, February 25, 2011

It's a Beautiful Morning!


It is a beautiful morning here is in South Florida, about 66 degrees and sunny, but it will probably get hot by the afternoon.  It seems like spring is coming early - darn!  Winter is what living here is all about and we hate to see it go.

This fortnight at Fairy Fun Friday, we want you to be inspired by a song.  I wanted to do a song about spring, but couldn't find one I liked so I settled on It's a Beautiful Morning by the Rascals.  Yes, I'm definitely showing my age!  Here's my sweet little birthday card I made with the Prairie Fairy's Daffodils digital stamp.  The music notes are from an ancient Art Impressions stamp that comes in handy now and then.  I love the way the notes swirl around the flowers.  Noting too complicated on this card.  The DP is digital from Digital Delights, I used a couple of Spellbinders dies and got out  my Gold Mixative Adirondak Alcohol Inks and used it around the main panel and to change the silver brads to gold.  I also used some gold glass glitter to bling it up a bit.  The ribbon is from Stampin' Up.

Hope you will stop by the Fairy Fun Friday blog to be inspired by the other DT's songs and maybe be inspired to make a card for our challenge.  It's a fun one this week.


Challenges Entered:
Stamptaular Sunday - S.O.S. (someone special)
Incy Wincy Designs - Punches/Die Cuts
Flourishes Timeless Tuesday - Birthday
Fussy and Fancy - Embossing or Paper Piecing
Stampin' Bs - Use a Flower
Allsorts- Inspired by Nature
Crazy4Challenges - Use Dies
Drunken Stampers - Use Dies
Alota Rubber Stamps - Use Dies

Monday, February 21, 2011

Friends - A Vintage Wallhanging


Here we are again at the beginning of another week and another marvelous Monday with Simon Says Stamp and Show.  This week our challenge to you is to show us your Stripes.  And as usual, only a small amount of my pretty wallpaper inspired DP peeks out  :(  I used a large chipboard circle as a base and then covered it with brown wrapping paper.  I stamped the  Tim Holtz "Creativity is" stamp from the Regal Flourish in Memento Tuxedo Black and then ink distressed it with Vintage Photo.  The corrugated cardboard was painted with a Snowcap Adirondack Paint Dabber and ink distressed with Vintage Photo.  The Spellbinders die cut frame was stenciled with Picket Fence distress crackle paint.  All the layers were glued together with Claudine Hellmuth Multi-Medium Matte.  If you haven't tried that stuff, you should.  I am fairly new to using it and I just love it.  It is perfect for mixed media art like this!

My little hanging sign is a piece of holiday chipboard that I covered with DP and Vintage Photo distress inked the edges.  Then I ran it through an embossing folder.   I used a couple of jump rings to hang it from the doily and added a crystal from an antique chandelier to each side.  

Now it's time to take yourself over to the Simon Says Stamp and Show challenge blog to see the rest of the striped goodies.  And how about joining our challenge this week?  Our ever-generous sponsor is offering a $50 shopping spree to the lucky random winner of this week's challenge.  That's reason enough to enter, right?


Thanks so much for stopping by today.  I do so very much appreciate your comments!

Thursday, February 17, 2011

Friends Forever


Good morning!  Hope you are having a great week.  Today I have a card to share that I made as a guest designer for Do it With Digis.  This is one of my favorite images from the Prairie Fairy called A Helping Hand and sentiment is from Sentiments 4 You.  The challenge this time at Do it With Digis is a really lovely sketch challenge.  The papers are Pink Pirouette and Close to Cocoa from Stampin' Up! and the pink/brown digital paper is from Summertime Designs - Happy Mother's Day kit (I darkened the brown pattern with my PhotoShop) and the green digital paper is from Barely Mine Designs Vintage set.  The newsprint from which I die cut the butterflies is Classified Ads from Whimsey Stamps and has become a favorite go to stamp for me.  Too bad the sweet little butterflies don't show up well against that busy DP background.  
I hope you will stop over to Do it With Digis to check out the beautiful work of the design team and maybe participate by using this beautiful sketch.  Thanks for stopping by today!


Challenges Entered:
Oh La La - For Someone Special
Digital Tuesday - Use a Die Cut
Flourishes Timeless Tuesday - Use Three Patterned Papers

Wednesday, February 16, 2011

Tutorial - Enameled Flowers


I've had a number of inquiries about the enameled flowers I made for my Simon Says Stamp and Show project last week so I thought I would do a tutorial on them.  Now I am a rank amateur on doing tutorials so be kind, please!  I am using the Ranger Melt Art Melting Pot.

To construct my flower, I used the dimensional flower tutorial on SplitCoastStampers and my trusty Tim Holtz Tattered Florals (yeah, I know you are tired of hearing how much I use that darn thing).

I used Very Vanilla Stampin' Up card stock and ran the die cuts through the SU Vintage Wallpaper embossing folder.  Antique Linen distress ink was used to ink the edges and high spots of the dry embossing.  I curled the edges, glued and shaped the flowers prior to coating them with the UTEE.  Do NOT assemble the two petal piece.  You will coat that one uncurled.


Because I was not going to dip the flowers, I didn't need to melt much UTEE.  I learned from the first round of enameled flowers that after the UTEE sits and cooks for awhile it thickens and is hard to work with.  Plus I inked the edges of my petals and some of the ink released and colored the UTEE.  It became very yellow and sticky and I ended up discarding a good quantity of it.  I learned to heat a little at a time and add a bit more as needed.


I had used my brush for the UTEE before so it had hardened but was softened up by laying it in the melted UTEE.  You will want to use a brush with natural bristles (not nylon/synthetic) so they don't melt.  I was only able to get three sessions out of a brush before it started losing the bristles and leaving little hairs on my flowers.  I'll have to experiment with brushes to see what holds up the best.


Time to start painting the UTEE on the assembled flowers.  Spread out a non-stick craft sheet so your flowers don't stick.  Work quickly because the UTEE hardens fast.  Paint on a nice layer, not too thick or too thin.  Don't worry if it looks lumpy and rough.  You can hit it with your heat gun later, re-liquify the UTEE and smooth it out nicely.  I started by holding on to one petal, painting several, letting them cool and turning so I could hold a petal that had already been painted.  Paint some on the edge of the back of the petals too.


For the smallest piece, the one for the very center of your flower, curl and shape it but then uncurl to coat.  I laid it right on the melting pot tray and very quickly coated it on both sides.  Lifting it out, after it cooled a couple of seconds but before it hardened, I rolled it up tight.  Again, don't worry if the UTEE is rough and lumpy.


Now its time to smooth out all the rough UTEE by running your heat gun on each flower piece.  You can see the front most petal here has been heated and is now nice and smooth and shinny.


Here they are, all nice and shiny and ready to be assembled into a beautiful enameled rose.


Thanks for your visit.  Let me know if you have any questions.   I'll be back later this week with a very short tutorial on how I made the smaller enameled flowers.

POST UPDATES:  A reader asked if it was possible to make these flowers using UTEE without the melting pot.  Yes, you will likely need to do two coats of UTEE and it's pretty messy but it is possible.  I made one like that before I purchased the melting pot.

Another reader asked about the staging for my photo.  That's actually not a card the flower is sitting on, but rather bits and pieces that have been floating around on my craft desk.  I wanted a pretty little background for the flower to take the picture so I grabbed a felt heart that I had cut with a Nestability and sewn with a blanket stitch.  I had intended to use it for a Valentine's card but it never seemed to fit.  There is also a chunk of crocheted lace and a strip of Very Vanilla paper that was embossed with the Textile embossing folder and sponged with Vintage Photo ink. Oh, and the edges had been punched with a Martha Stewart border punch.  Basically I grabbed what was at hand and made a stack to sit the flower on.  The stack is sitting on top of a blank sheet of Baja Breeze card stock. It's as simple as that!

Tuesday, February 15, 2011

And the Award Goes to...

I don't usually participate in blog awards but I was so touched by Sylvia/Little Treasures by Sylvia's award this morning, that I felt inspired to pass it on.

However, when I sat down to try to decide exactly who I wanted to pass the award to, there are so many blogs and bloggers who have inspired, coached and supported me over the past two years that I just couldn't narrow it down to five.  Rather than risk anyone feeling left out, I am not going to pass on the award.  I will, however, take this opportunity to tell you five things about myself.

1.  I live in Miami, Florida with my husband of 36 years.  We have two children, both in their 20s, neither of whom is married so we have no grandchildren.
2.  I left the corporate world 6 years ago due to a downsizing and wanted to do something meaningful with my life.  So I have been through a series of part-time jobs since then and am still searching.  My latest venture was to start up and run a mega food pantry for my church.  We are currently providing food for at least 300 families each week.  Unfortunately, I will attend a board meeting tonight when the pastor informs us that he has decided to shut the program down.  So I don't know what my future will hold from here out (I may be unemployed come tomorrow!).
3.  I am a big social justice advocate and have taught programs on Catholic Social Teaching.  I do a lot of advocacy for those left behind by the economic system, both in our country and internationally.  Ending hunger/starvation is my main focus (did you know that 25,000 people worldwide die EVERY DAY from lack of nutrition???).
4. We are FLORIDA GATORS.  My husband and I plan to retire and move upstate to Gainesville, Florida sometime in the next 18 months.  One reason is that we want to be near my aging parents, but we also love college football and basketball.  One of our "bucket list" items is to attend a football game at every SEC school we play.  
5.  From my high school days onward, I have always been involved in some type of craft.  I rarely take classes and just figure things out on my own.  Paper crafting has been my biggest craft love affair to date.  I work on some project for a portion of every day or evening, sometimes neglecting housework, laundry and cooking!  (My saint of a husband tolerates that neglect with love and humor.)  I approach card making as creating art.  Every time I sit down to make a card, I don't want to just make a card.  I want to make a thing of beauty that is more beautiful than anything I have made before.  This artistic outlet fills a need in my soul.  

Thank you for letting me share a little bit about myself.  Since I am not passing on the actual award, maybe I could ask you to reflect on those who have inspired you in the paper crafting world and that you leave them a comment thanking them for how they have influenced your art.  

And, thank you Sylvia for the honor you have given me! 

POST UPDATE:  Thank you, everyone, for your kind words.  Those of you who asked about the fate of our food pantry, the decision was that we could continue to run a food pantry but we must move off church property.  This is because we have a school and have had issues with my clients wandering around on school grounds.  So I am now tasked with finding a warehouse that can be turned into a food pantry/outreach center and getting that going.  Praise God, I still have a job and we can continue feeding people.  Thank you for your interest and concern!

Monday, February 14, 2011

Pink Enough?


Hi there and welcome to my Simon Says Stamp and Show post.  I wish you all a happy Valentine's Day.    Our challenge to you this week is to show us a tag.  I've been making a lot of Valentine's art recently and although this isn't truly a Valentine's piece, you can tell by the colors that I am still in that mode.

All tags must be vintage, right?  So I started my vintage tag by stamping from Urban Grunge, Flights of Fancy and Mini Holidays in Aged Mahogany.  Then I applied one of my very favorite Tim Holtz techniques - Rusted Enamel over the entire tag and treated the edges to a bit of gold UTEE.  The glittered oval frame was cut with a Spellbinders Petite Scalloped Oval die and distressed with Tattered Rose ink.  The frame was embellished with Spellbinders Floral Accent die cut which was painted with Tattered Rose crackle paint and crowned with one of my enameled roses that just happened to be sitting on my work desk waiting to be used.  The sentiment was printed on my computer and attached with one of Tim's tiny safety pins and the shabby seam binding was dyed with Tattered Rose distress ink.  

I know there's not much originality here, but cut me some slack.  I've been sick for 4 days now and I think my mojo has dried up and blown away.  I have to tell you that I struggled with this tag for over 8 hours, just putzing around, changing this and re-doing that.  I don't know why but nothing seemed to gel for this make.  Today I received some gold glass glitter and wished I had had it yesterday to use instead of the white glitter.  Maybe that would have better satisfied me.  

So now skedaddle from here and see what my teamies at Simon Says Stamp and Show have whipped up for your inspiration.  I guarantee you will LOVE what you see there.  And then see what you can come up with for a tag this week.  Our generous sponsor, Simon Says Stamp, has a $50 random prize this week.  Wouldn't you love a $50 shopping spree at Simon Says Stamp?  Believe me, they have EVERYTHING on your wish list!


Thanks so much for stopping by today and for any comment you care to leave.  


POST UPDATE:  I had an inquiry from a reader about the image I used here.  It is a vintage download from the Internet and the site where I acquired it several years ago is closed.  So if you would like it, please email me at thefunkiejunkie@gmail.com and I will send it to you.

Saturday, February 12, 2011

Vintage Paper Doll

Welcome friends! Happy to see you back for Our Creative Corner's Saturday challenge.  This week, our wonderful host Lori Rider is challenging us to Cut it Out!  That's right, do some fussy cutting, paper piecing, paper toll, out of the box or other type of cutting on your project this week.  I decided to play with paper dolls.  I had grabbed this little vintage cutie from Vintage Image Crafts recently (if you sign up for their newsletter, they send you vintage images now and then).  I thought she would be the perfect thing to cut out.  I used the Mojo Monday sketch and created the vertical panel with SU's So Many Sayings stamp.  I vintaged it up a bit with a Fiskars corner punch and some stamps from Inque Boutique.  I used some of SU's retired Cerise DSP and stamped in Real Red.  Then I whipped up a felt flower edged with bright red Stickles, cut a Spellbinders tag and die cut a small red glittery heart with some new SU paper that sparkles but doesn't leave glitter all over.  My SU demo gave me a small sample and it came in handy here.  I also did a bit of stitching and threw on a scrap of shabby red seam binding.  This card makes me smile.  

Hope to see you over at Our Creative Corner.  There's a lot of good stuff happening over there these days!  We have some talented new additions to our design team and some of our more senior designers are still there turning out beautiful samples every week.  


Challenges entered:
Mojo Monday - Sketch
Flourishes Bring Back Beautiful - The Beauty of Love
Sentimental Sundays - Happy Valentine's Day
Stamptacular Sunday - Hearts Gone Wild
The Pink Elephant - Be My Valentine
Crafts and Me - It's Red!
Cute Card Thursday - Hearts and Flowers
Just Add Ink - Just Add Love
Stampin' for the Weekend - St. Valentine's Day
Crazy 4 Challenges - Use Hearts

Friday, February 11, 2011

Love You Forever


It's time to play with the fairies at Fairy Fun Friday.  This fortnight our challenge to you is In The Fine Print.  We want to see some printing on your card that is not part of the sentiment.  I made this tag for several challenges besides the Fairy Fun Friday.  I used the Fairy Love image again from Prairie Fairy that I think is so darling.  And more of my enameled flowers, which I am working on a tutorial for - check back later in the weekend for that.  I also used UTEE on the heart and banner, but not with the melting pot - just Versamarked them and applied two coats of UTEE.  The designer paper is digital from Raspberry Road printed on white CS and cut with a Spellbinder die.  Kraft CS was used with Chocolate Chip ink, the text was clear embossed and then more Chocolate Chip ink was sponged around the edges.  I also used a Prima flourish and text stamp in the lower left corner, after stamping off twice because it wanted it to be faint.  The image was colored with Copics and the wings hit with a little Stickles.

That's it on the dets for this one.  Hop on over to Fairy Fun Friday and see what the rest of the team has made and maybe even swing by their personal blogs and leave them some love.

Thanks for stopping by today.  Love you all!


Challenges Entered:
CR84FN Color Challenge:  Light Pink, Bright Pink and Chocolate


The Kraft Journal - Love
The Shabby Tea Room - Sweet Hearts
Tag Tuesday - Tag on a Tag
Try it On Tuesday - Hearts and Flowers
Sentimental Sundays - Happy Valentine's Day
Stamptacular Sunday - Hearts Gone Wild
Flourishes Bring Back Beautiful - The Beauty of Love
Flutterby Wednesday - At Least 3 Hearts
Simon Says Stamp - Anything But a Card
Cute Card Thursday - Hearts and Flowers
The StampMan - Hearts

Monday, February 7, 2011

Enameled Flowers


Welcome back, friends!  So happy to have you back to see what we have for you this week at Simon Says Stamp and Show.  This week, we are asking you to show us Some Embossing.  Easy peasy, right? The fact is that I rarely make a piece without at least some sort of embossing so for this challenge I wanted to branch out and try something new.

I have wanted a Melting Pot for some time now and this challenge pushed me over the edge.  I decided the time had come to make the investment. I played around with it and came up with these enameled flowers.  I had to try a couple of different ways to coat the petals and found that painting the hot UTEE on rather than dipping the petals worked best.  Of course, you need to have a paint brush that you don't mind sacrificing.  You can use the same one over and over by reheating the brush in the the hot UTEE.

I seem to be fixated on calendars recently.  I realized last week that I hadn't done one for my desk for February so I made this little book type calendar with two chipboard coasters.  I added a couple of vintage images and made a couple more of the enameled flowers.


All the flowers were cut with my trusty Tattered Florals die.  The larger leaves were cut freehand and the smaller ones with the Martha Stewart rose leaf punch.  All flowers and leaves were embossed with the Victoria Cuttlebug embossing folder, as was the Spellbinders die cut heart on the front cover.  The crinkled seam binding was dyed with a combination of Aged Mahogany and Dusty Concord distress inks and a black rhinestone Prima Say It In Crystals flourish finished it off.


Now it's time to hop over to Simon Says Stamp and Show and see what kind of embossing fun my teamies have had this week.  There are some fantastic projects there that you just gotta see!  And then run to your craft desk and whip up a sweet little project showing us some EMBOSSING and link it up.  You just might be the lucky random winner of a $50 shopping spree from our awesome sponsor Simon Says Stamp.

Thanks so much for stopping by today and for all your wonderful comments.  I truly do appreciate all my visitors, especially those who take time to leave a comment.

Saturday, February 5, 2011

Branching Out and Breaking Free

Welcome, once again, friends to my Saturday post for Our Creative Corner.  This week, our host is Lori Rider and she has a tough challenge for us.  She wants all of us to branch out by making a CAS card with a tree on it.  Now, you might not think that it is tough to make a CAS card, but I found it to be a major challenge.  My first card didn't make the grade.  I had it all made and even photographed it and uploaded it to a draft post on my blog, but decided it just wasn't me.  So I tossed it and went back to the drawing board.  And here's the result.  I like it much better than the first.  It still has my signature vintage feel to it, but I didn't rip up the edges and I didn't stitch on it.  And really not much in the way of embellies so I deem it CAS.  


I stamped the single tree from Lovely as a Tree three times using masking to do so.  Then I over-stamped the bird and branch from Tim Holtz's Urban Grunge set in Memento Tuxedo Black and clear embossed it.  I sponged the edges with Vintage Photo distress ink and created the sentiment on my computer.  The tag is a Spellbinders die, the black paper lace was made with a Martha Stewart border punch, the background Classified Ads stamp is from Wimsey Stamps and the buttons are SU.  The papers are Kraft, Whisper White and the gingham is from Jo-Ann.  

Thanks for stopping by!  I want to give a huge thank you to all my followers - both new and old.  I so appreciate your comments and encouragement.  I hope you will all stop by Our Creative Corner to see the beautiful CAS cards the team has made.  We would love to have you "Branch Out" with us this week.  


Challenges Entered:
Little Red Wagon - Use Kraft
Pixie Cottage - Buttons and/or Sketch
CCEE Stampers - Use Punches
Dutch Dare Card Challenge - Button, Button
Paper Play Challenge - Stamp in Out
Blog Widget by LinkWithin


I changed my font at thecutestblogontheblock.com