Tuesday, August 31, 2010

Vintage School Girl & Another Good Bye


Hello! Thanks so much for stopping by my blog. It's time again for the fortnightly challenge at the Creative Card Crew. This will be my last challenge with this design team. I've been with them for almost a year and I'm stepping down to make more time in my schedule to play in the challenges that I want to play in. While I do love to be on a few design teams, I have decided that I need time to be able to make the cards and projects that I want to make and not be bound by a set of criteria for every single project. At the peak, I was on six teams and was turning out almost a card a day. It takes me 5-6 hours to make one card so I was spending too much time in my craft room and then rest of my free time at my computer making comments. Finally I decided enough was enough.

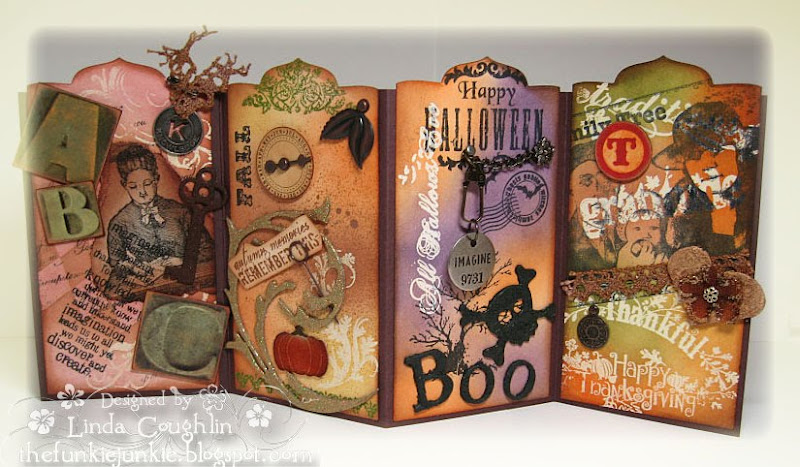
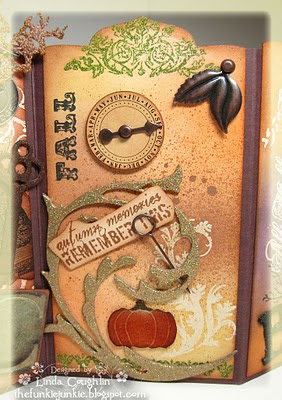
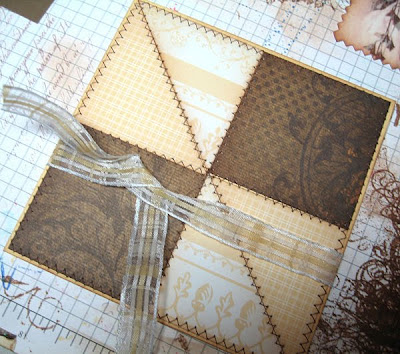
Our challenge theme at the Creative Card Crew this week is Back to School. I really puzzled over this one for a few days and then I found this vintage school girl in my vintage image files and the design began to come together. I found a sheet of designer paper in the Tim Holtz Lost & Found paper pad that had ABC flash cards on it, but as usual I covered most of it up. I also used one of Tim's new Texture Fades (embossing folders) called Note Paper. I cut a piece of SU Natural CS with the Top Note die and ran it through the Note Paper Texture Fade. I sponged it with Vintage Photo distress ink and also spritzed it with a mixture of Vintage Photo reinker, water and Heirloom Gold Perfect Pearls. The flowers were cut using the Old School digital DP from Raspberry Roads Designs. (BTW, Raspberry Road is having a 50% off sale this week. The Old School pack was just $1.) The small flowers were made using Spellbinders Flower Creations 3 dies and the larger, red flower was made using the Tim Holtz Tattered Florals die. The tickets were stamped with the Autumn Leaves Ticketed set.

Thanks again for stopping by. Hope you will also stop over to the Creative Card Crew to see what the other designers have for your inspiration.


Challenges Entered:
Pile it On - Farewell to Summer
Die Cut Dreams - Soft Shades of Vintage
Incy Wincy Designs - Back to School
The Shabby Tea Room - Old Meets New (old - SU CS, vintage image, seam binding, new Tim Holtz products)
Artful Inkables - Distressed Out
All That Scraps - Crinkled Ribbon
Little Red Wagon - Back to School
Pixie Cottage - Sketch and/or Back to School
Fussy & Fancy - Back to School
Stamp Something - Back to School

Monday, August 30, 2010

Sugar & Spice, Ribbons & Curls


Well my dears, here it is again, another Monday morning and time for another Simon Says Stamp and Show challenge. At least there is one good thing to look forward to on Monday mornings, right? This week our challenge is Layers, which you can interpret any way that speaks to you. My layers project all started with these charming vintage images of little girls and that yummy row of blue and white lace. I decided to base it on that old rhyme - what are little girls made of? Sugar and spice and everything nice, ribbons and curls because she's a girl. How swee is that?

My first layer is corrugated cardboard that I painted with Adirondack Acrylic Paint Dauber in Snow Cap and then spritzed with Ranger Cranberry alcohol ink. I've had a box of K&Co. Christmas chipboard in my stash forever - never used it because it's not really my style. So I covered it with designer paper on which I had printed the title and rhyme words. Then I ran it through the Idea-ology Cracked Texture Fade and inked up the edges with Vintage Photo. I mounted all of the chipboard on a piece of cardstock DP, added the vintage images and a few pretty brads plus a grunge paper flower and my project was good to go. Sounds quick and easy, right? Well actually I worked on it most of the day Saturday, fiddling with this and that, trying one thing, changing another - my typical style with everthing I create. Let me know what you think of it. I'm never really sure if my art is any good or not.


I hope that now you're off to check out the blogs of the rest of the design team. They always have fabulous art, week and week out.

♥Linda Elbourne, DT Coordinator - A Crafting Journey
♥ Dan - My Crafty Life
♥ Lynne Forsythe - The Next Best Thing
♥ Lori Hassler - I Been Thinkin'...'Bout Inkin'
♥ Nancy Crissinger - What's Next???
♥ Nancy Wethington - Art From the Heart
♥ Terry Weitsma-Girbes - Terry's Cards & Creativity
♥ Katie Davis - Chantilly Rose
♥ Kim Costello - Paperbabe

Hope to see your entry over at Simon Says Stamp and Show this week. Thanks for stopping by and for any comments you care to leave.
Blessings & hugs,

Saturday, August 28, 2010

Our Creative Corner: A Color Challenge


Good morning and Happy Saturday! I'm so happy you stopped by this morning to view my sample for this week's color challenge over at Our Creative Corner. Our hostess, Wendy Jensen, has a wonderful color palette for you to work with this week.

When I first saw this color combo, I was pretty doubtful, but plunged in and I'm really happy with the results. It's nice to work with something out of the mainstream once in awhile and I had a lot of fun making this card. I took a sneek peek at the other designers samples this week and they are all really fabulous.

For my card, I made the bottom panel, which looks very much like gingham, using a crimper. I ran a panel of So Saffron through the crimper. Then I sponged all the high points with Old Olive. Then I ran it through the crimper again in the opposite direction and again hit the high points with Old Olive. I don't have Early Expresso so I stamped the flourish and the text on the panels with Tim Holtz Walnut Stain Distress Ink. The splatters were made by mixing water, one dropperful of Vintage Photo distress ink and a small scoop of Heirloom Gold Perfect Pearls, my new fav embellie. Shake and spray. The flowers were made by stamping the flowers from Best Blossoms with So Saffron and Cherry Cobbler, trimming them out and coating hem with Tim Holtz Crackle Accents.

Products Used: SU Script background stamp, Best Blossoms and Elements of Style. The text stamp on the heart was won in a blog candy and has no manufacturer's marking whatsoever. Ink: Tim Holtz Walnut Stain and Vintage Photo Distress Ink, Old Olive

Accessories: Lace from Jo-Ann's, Bead Caps from eBay, Flourish is a BossCuts die

Thanks so much for stopping by today. I hope you will join in the color challenge fun with us this week at Our Creative Corner.

Have a great weekend. Thanks for visiting and for any comments you care to leave.

Blessings & hugs,
Challenges Entered:
Lexi's Creations - Emboss It

Friday, August 27, 2010

Prairie Fairy Blog Hop & New Digi Release


WELCOME,
to the PRAIRIE FAIRY BLOG HOP and
DIGITAL RELEASE PARTY!


If you came here from Kelly's Kreative Korner then you are on the right track! If not, please head on over to the PRAIRIE FAIRY BLOG because you don't want to miss out on all the fun offers and prizes and the rules at the beginning of the hop!

What's up for grabs??? Well not only is the Prairie Fairy offering up some yummy candy at her blog, she is going to be giving out digital prize packs to some lucky winners worth $15 each! That's right you could win the newly released images! There are multiple prizes so make sure you start at the Fairy's blog so that you don't miss out on how and what you can win!

If you get lost along the way, here is the hop list:


The hop ends at FAIRY FUN FRIDAYS challenge blog where you will hear some new announcements and if you enter a card in the challenge you will get an extra entry into the draws and if you use a Prairie Fairy image on your creation you will get another entry! The challenge this week is to use PEARLS AND LACE on your card. Be sure to visit all the DT's blogs as there are prizes at stake if you do, and we all love comments! Here's what I am giving out for my blog candy. Just leave a comment and I will do a random drawing on Friday, September 10th. (Basic Grey 6x6" Euphoria paper pad, Hero Arts Pearls and Gems, Jolee's tiny flowers, 2 clear mini stamps and a set of Daisy D's embellishments.)

Card Details:
Stamps: The Lighthouse by the Prairie Fairy, shells are stamped from a Flourishes set
Paper: Night of Navy, next level up is SU Natural stamped with an old map stamp in Memento Tuxedo Black and spritzed with my new fav embellie a solution of water, one dropperful of Vintage Photo ink and a craft stick scoop of Heirloon Gold Perfect Pearls. Combine everything together in a Mini Mister and mist away. Next layer up (blue) is a digital paper printed at home and after that a piece of the map paper from the K&Co. Sea Glass pad that I printed other Prairie Fairy nautical images on in black Too bad you can't see them - LOL! Again I spritzed with the Vintage Photo mix.
Accessories: Copic markers, cheese cloth spritzed with the Vintage Photo mix, Crystal Effects, Martha Stewart Pearls, Top Note Die, SU Corner Punch

We are so glad you joined us and hope to see your entry at the challenge blog! From here, just hop on over to Suzi's blog.

Update: A reader asked about a tutorial for the clouds. I used Annika Ryan's tutorial for the clouds. Her colors were a little to turquoise for me so I toned it down a bit with more gray (C1) and blue/gray (BV20 and B60) and then blended in a bit of pink (not sure but I think it was RV000 and V000). Also, while Annika advised to go up and down with her strokes, I went over mine several times with choppy horizontal strokes. Basically, I just played around with it until I got it to look like I thought it should. I also have good luck using an almost dry blender pen (0), picking up color from another maker and then applying with the blender pen. If it gets too dry, I add a couple of drops of clear blender solution to the tip, but I don't fill up the entire marker.
Challenges Entered:
Raise the Bar - The Hut (any kind of dwelling)
Just Add Ink - Just Add Material (mine is cheese cloth)

Wednesday, August 25, 2010

Sew Sorry


Today kicks off the last challenge for Isabella's Sketchbook. It's being suspended indefinitely as the lovely Isabella deals with a cross-country move and some family health issues. I am so sorry to see this design team end. I have really enjoyed getting to know some fantastic women who are also skilled paper artisans. Even though the challenges are suspended, Isabella's Sketchbook Digital Boutique will remain open - yay!! We'll still have the opportunity to purchase her beautiful digis.

Our challenge this week is to make your own flowers - something that I totally love to do. For my last card, I chose express my regret with Isabella's cute sewing basket digi. I used the sketch from this week's Waltzing Mouse Sketch Challenge. The papers are a digital download from Raspberry Road and the image was colored with Copics. I made the flower following the Dimensional Flower tutorial on SplitcoastStampers. The sentiment was printed on my computer.

Products Used:
Stamps: Digital Image by Isabella's Sketchbook, sentiment computer generated
Paper: Flourishes CS for image, Bravo Burgundy, Raspberry Road DP
Ink: Creamy Caramel, Copics
Accessories: Spellbinders Circle and Scallop Dies, Tim Holtz Tattered Foral Die, Creative Memories Cutting System for large shape, Martha Stewart border punch, floral trim, ribbon, button

I want to thank Isabella for choosing me for her first design team. It's been awesome working with her fantastic images. I wish her many blessings as she goes through the next few months.

Thanks so much for stopping by. Hugs and blessings to you too!
Challenges Entered:

Tuesday, August 24, 2010


Prairie Fairy is having a BLOG HOP!
When you ask? The fun starts this Friday, August 27th!


You don't want to miss this event. The Fairy has been a little quiet for a while but is back and breaking loose with some major blog candy, prizes, and a digital release that will blow you away!

The DT have also created some extra special projects for your viewing pleasures. The fun doesn't end there because all the DT is having their own candy giveaways at their blogs too!

You heard right! There is just too much candy to miss here! The fun all starts at 10:00am when the Fairy Fun Fridays challenge goes live.

soooooo, COME JOIN THE FUN!

It all starts at the Prairie Fairy Blog on Friday Aug. 27th 10:00 a.m. See you then!


Monday, August 23, 2010

Autumn Accordion Tag


It's that time of the week when we have the wonderful unveiling of DT projects for Simon Says Stamp and Show. I hope you are as excited as I am for Monday morning to come around so you can find out what our weekly challenge is and to be inspired by the design team's samples. This week we are challenging you to make a project in your best Tim Holtz style. For many people, Tim Holtz brings tags to mind and you'll see that held true for the design team as well. I chose to make tags too - with a twist. Mine is a home decor project - an accordion style tag celebrating the autumn months. The four panels represent August with a back-to-school theme, September - the true beginning of autumn, October with Halloween and Thanksgiving in November.


Even with no stitching, this was a fairly labor-intensive project, but it was a lot of fun so I didn't mind. Plus I have decided to keep it myself and use it in my fall decorating. Fall is my favorite season and I love to decorate my home with leaves, pumpkins and other autumn icons.
I have quite a few Tim Holtz embellishments, but not many of his stamps. So I relied on other stamps seasonal stamps that had a vintage feel to them and added the TH embellishments. I must say, I was rather nervous again this week when trying to come up with an idea for a project. The bar is very high with the talent on this DT and I didn't want to let my teammies down. Now that the project is finished, photographed and posted, I'm feeling pretty good about the outcome.

I hope you'll play along with us this week at Simon Says Stamp and Show. The prizes are always fantastic and you can't win if you don't play! I'm sure you'll want to visit the blogs of the other talented design team members:

♥Linda Elbourne, DT Coordinator - A Crafting Journey
♥ Dan - My Crafty Life
♥ Lynne Forsythe - The Next Best Thing
♥ Lori Hassler - I Been Thinkin'...'Bout Inkin'
♥ Nancy Crissinger - What's Next???
♥ Nancy Wethington - Art From the Heart
♥ Terry Weitsma-Girbes - Terry's Cards & Creativity
♥ Katie Davis - Chantilly Rose
♥ Kim Costello - Paperbabe

Thanks for stopping by. Can't wait to see what you make for the Tim Holtz inspired challenge this week!

Blessings & hugs,

Saturday, August 21, 2010

Our Creative Corner Sketch Challenge


Good morning and happy Saturday. Here I am again for Our Creative Corner. This week our hostess, Wendy Jansen has a sketch challenge for you. I have to admit, I fudged it just a bit - I forgot about the ribbon across the main panel until I had the whole thing put together so I combined it with the right top corner element. Hope Wendy will forgive me for messing up her sketch!

I combined this challenge with the colors for this week's Play Date Cafe challenge - light and dark greens and blue. I set out with my normal shabby chic style, sponging and scissor distressing the edges. The frame was embossed with Tim Holtz distress embossing power and I used his Tattered Florals die to cut canvas on which I applied two colors of alcohol inks. I've seen a couple of examples of canvas recently and it looked sweetly shabby so I purchased a small piece this week to play around with.

Products Used
Stamps: Bluebird from Artistic Outpost, music from Stamp Oasis and the Thanks stamp is from Celebration of Thanks by Verve
Paper: SU's Old Olive and (retired) Bermuda Bay, DP from Rasberry Road Designs Moments in Time and Pressed in Time digital paper packs
Ink: Stuart Superior India Ink, Tim Holtz Vintage Photo Distress Ink, Versamark
Accessories: Brad from SU, SU Word Window Punch, the flower brad is from Little Yellow Bicycle (old, probably not available any more - been in my stash forever), Tim Holtz Peeled Paint Distress Embossing Powder, Tim Holtz Tattered Floral die, Tim Holtz Alcohol Inks in Stream and Meadow

Hope you'll skip on over to Our Creative Corner to see what the other designers have done with Wendy's sketch. Hope you'll check out their personal blogs too!

Wendy JensenDana GrothausDiane GilbertJennifer MeyerJulie LeBlancSarah GoughLori Rider

Thanks so much for stopping by today. Wishing you a wonderful weekend!

Blessings & hugs,
Challenges and Such Entered:
The Play Date Cafe - Color Challenge: Blue and Shades of Green
Fab 'n' Funky - Flower Power
7 Kids College Fund - Strip it Down (no more than 2 layers of DP)
Res-Q-Challenge - Time for Some Therapy (my fav is vintage!)

Friday, August 20, 2010

Punch it Up at Fairy Fun Friday

Hello friends, thank you so much for stopping by today to check out my sample for Fairy Fun Friday. This week, we want you to show us how you can embellish your work using punches. There are so many wonderful punches to choose from these days and we're excited to see all the variety that will be entered into this challenge. For my card, I used a Marth Stewart punch, nothing to jazzy this week. I had planned on doing something a little more special, but honestly when I finished coloring this image, I really wanted to let it take the center stage. Isn't it gorgeous? It's brand new digital image from The Prairie Fairy. I don't think it is even in her store yet, but it will be very soon. I was a bit nervous to color it because I usually don't have good luck coloring watering cans. But this colored up beautifully and I was very pleased with the result. I love the overall color palette, especially the designer paper. I think it looks very Old World, maybe with a slight French flavor to it.

Products Used:
Stamps:
Digital image from The Prarie Fairy, sentiment stamp from Tim Holtz, Stampers Annoymous, SU Floral background stamp
Paper: DP from Raspberry Road, SU CS in River Rock and Chocolate Chip, Flourishes White CS for the image
Ink: Copics, Old Paper, Creamy Caramel, Vintage Photo
Accessories: Spellbinders dies for the die cuts and the handmade flowers, large brad from Michael's, bead cap from eBay, Versamark, clear EP, spiral clip from SU HodgePodge Hardware, Tim Holtz Antique Linen Distress Stickles

I hope you will stop by Prairie Fun Friday to see what the other designers have created this week. And maybe you could stop by their blogs to see more of their wonderful work.

♥Margreet - Margreet's Scrapcards ♥Suzi - Sugar n Spice♥Viv - Crafting Haven♥ Hege-Annie - Hege-Annie's Paper {He}Art++ ♥Ann - Raindrop Echo Designs ♥Carla - Carla's Corner ♥Corry - Fancy Free 4Ever ♥Lori - Just Ducky ♥Kelly - Kelly's Kreative Korner♥Trisha - T-Bear's Touch ♥Sue - Arty's

Thanks so much for stopping by today! I sincerely appreciate your comments. Have a wonderful weekend!

Blessings & hugs,
Challenges Entered:
The Pink Elephant - Ribbons & Sparkles
Res-Q-Challenge - Time for Some Therapy (mine is vintage!)
Stamp Something - August Digi Day

Wednesday, August 18, 2010

Sweet Little "Miss"


Welcome to Wednesday! It's Isabella Sketchbook time again and this week we are challenging you to make a card that hides something. I chose a pocket card since I have never made a design like this before. I used the Isabella's Sketchbook Waiting image which I think is among the sweetest in her digi boutique. I colored her with Copics and did some paper piecing to create wall paper and the window shade. I printed the sentiment and the digital designer paper on my printer and I finally found a perfect use for my SU crocheted flower.


Products Used:
Samps: Waiting by Isabella's Sketchbook
Paper: SU Cardstock - Wild Wasabi and Whisper White, DP is from the Oh So Shabby Paper Packs 1 & 2 from Raspberry Road Designs
Ink: Copics, Creamy Caramel and Vintage Photo, Printer Ink
Accessories: SU Border Punch, Spellbinders Fancy Tag Die, lace and ribbon from Jo-Ann's, crocheted flower from Stampin' Up! The pink cord came as a freebie with something I ordered. I wish I remember where because I would like to order more - LOL!!

Now it's time to hustle on over to Isabella's Sketchbook challenge to see what the other designers have been up to this week. I'm sure it's something special because we have a truly talented design team!

AnnikaCecDianaJackieLindaLisaPeggyPeriRandiSharonSueViv


Challenges Entered:
The Shabby Tea Room - Delicate Cottage Rose (see inspiration photo on blog)
Order of the Opus Gluei - You Gotta Move It (out of your stash)
Stamptacular Sunday - Buttons and Bows
Sentimental Sundays - Ribbon or Lace
Alphabet Challenge - P is for Punches
Frosted Designs - Recipe Challenge: Use 5 or more of: Punch, Felt, Ribbon, Colors pink, blue or purple, flowers, banner, bird, buttons, butterfly, glitter
Allsorts Challenge - Paper Piercing/Paper Piecing
Secret Crafter Saturday Challenge - What Are Little Girls Made Of?

Tuesday, August 17, 2010

Forever Shimmer and Shine


This fortnight, our challenge to you at the Creative Card Crew is to make a card with shimmer and shine. That's always fun, right? An easy peasy challenge so we're looking for a great participation. Our sponsor this time is The Digi Shack and they have kindly offered the design team an image to use. I chose this lovely silhouette for my shimmer an shine card.

Products Used:
Stamps: The Digi Shack, sentiment from SU Always set
Paper: Basic Black, Whisper White
Ink: Memento Tuxedo Black, Printer Ink
Accessories: Vintage Wallpaper embossing folder from SU, Cuttlebug Heart Blocks embossing folder, Cuttlebug Ornamental die, Spellbinders Classic Ovals and Lattace Pendant Die, silk flower and lace with rhinestones from Jo-Ann's, black rhinestone flourish from Prima

That's it for today. Hope you will play along with this fun and easy challenge at the Creative Card Crew.

Thanks for stopping by and have a great day!

Blessings & hugs,
Challenges Entered:
Sentimental Sundays - Lace or Ribbon
A Pocket Full of Posies - All That Glitters
The Crazy Challenge - You Are My Heart
The City Crafter Challenge - Isn't She Lovely?
Artful Inkables - Bling it On, Baby

Monday, August 16, 2010

Go Change the World


Week #1 of the new Simon Says Stamp and Show challenge has come and gone and the design team is elated by the response. We had over 200 entries and they were all absolutely WONDERFUL. We had such a great time looking through all of your amazing pieces of art with wings! We hope you will be back to play along with us this week. Our challenge to you is to make something Wendy Vecchi/Studio 490 style. Well, I'm embarrassed to say that until a few short weeks ago, I was not familiar with Wendy's work, but now I'm loving the chunky funky feel of it. I don't own any Wendy Vecchi stamps or her Art Parts, but I was game to give it a go and here is the result. I'm actually quite pleased with it.

While I was in the design phase of this project, I needed a card for a young friend who recently graduated from high school and is leaving this week for college. Having several projects on my desk, I didn't feel like I had time to make a card for her so I hit my local card shop. You know, I just couldn't purchase a card! I browsed through the selection and nothing was a fit. So I decided that I had to make a card for her. And then I realized that the wall hanging I was designing could be a wonderful substitute for a greeting card. I already had the Tim Holz stamp stamped on my base and had printed out one of my all-time favorite quotes and created a tag with it. All I had to add was "Go Change The World" and it was a perfect fit for someone at the beginning of their adult life. And that is always my prayer for young people - that they will be inspired to use their education and gifts to make a positive difference in the world.

So there you have it - my first Wendy Vecchi style creation, but not the last. I had such a blast working with that Gungepaper. I made the rose following the Dimensional Flower tutorial on SplitCoastStampers.

Products Used: Tim Holtz Tattered Florals Die, Tim Holtz Idea-ology Grunge Paper, Tim Holtz Distress Ink in Forest Green, Aged Mahogany and Vintage Photo, Tim Holtz Grungeboard Elements Plain run through the Tim Holtz Cracked Texture Fade embossing folder

Hope you will be joining in the fun with us this week at Simon Says Stamp and Show by making something Wendy Vecchi style. Look at this amazing prize for a random winner and the Top 3 picks by the design team will receive a badge for their blog.

Be sure to stop by the blogs of the design team. We have a super talented team and I know you'll want to check out their work.

♥Linda Elbourne, DT Coordinator - A Crafting Journey
♥ Dan - My Crafty Life
♥ Lynne Forsythe - The Next Best Thing
♥ Lori Hassler - I Been Thinkin'...'Bout Inkin'
♥ Nancy Crissinger - What's Next???
♥ Nancy Wethington - Art From the Heart
♥ Terry Weitsma-Girbes - Terry's Cards & Creativity
♥ Katie Davis - Chantilly Rose
♥ Kim Costello - Paperbabe

Thanks so much for stopping by today. I deeply appreciate any comments you care to leave!

Blessings & hugs,

Saturday, August 14, 2010

School Days, School Days, Dear Old Golden Rule Days


Wow, I can hardly believe that it has rolled around to Saturday again. Where does the time go? Now it's back-to-school time pretty much all over the U.S.A. so we will be seeing a lot of school themed challenges popping up. And that's our theme this week at Our Creative Corner. There are lots of cute school images available, but of course I had to slant my creation towards the vintage mode. I had my card designed and ready to start assembling when I saw this delightful vintage schoolgirl image over at Digital Two for Tuesday. I immediately switched images and used this one. And so it goes...another vintage card for your inspiration.

You may have seen these vintage A-B-C flash cards here previously. Earlier this year, when I was on Sugar Creek Hollow design team I made cards with them featuring the flash cards (full size) as the main image. One thing that has really sold me on digital images is that you can resize them, thus making them highly flexible. For this project, I wanted the DP to show though so it worked best to make them miniture size in relation to the rest of the images. The apple, which was colored with Copics and coated with Tim Holtz Rock Candy Distress Stickles was also resized and used from the A flashcard. I created the slate (chalk board) by sponging white pigment ink across it first so it looked like a blackboard that had been erased, then stamping the sentiment in white pigment ink. I used a piece of woodgrain paper from Cosmo Cricket and cut it out to look like the wood frame of a slate.

When I was growing up, I was fortunate enough to be able to spend a great deal of time with my grandmother who talked to me about certain things in her life. She used to sing old songs to me , one of which was the "School Days" song that I titled this post after. She loved what I called antiques, but to her were probably just things that she grew up with and were familiar to her. She had an old student desk from the early 1900's that she let me sit in and use as well as the chalkboards she called slates. I feel like my grandmother might have been very similar to the girl in this picture. I thought a lot about her when making this card and am dedicating it to her memory. I don't keep very many of my cards, but ths one feels special to me and I am going to display it in my studio. Okay, so enough about my flashbacks, here's the dets on the card.

Products Used:
Stamps: Ornamental Frames from Inkadinkado, sentiment from Rubbernecker, ABC flash cards from Sugar Creek Hollow
Ink: Creamy Caramel, Tim Holtz Vintage Photo DI, Ranger Adirondack Pigment Ink Pad Snow Cap White, Versamark
Paper: Very Vanilla, Love Letter DP from SU, Cosmo Cricket Slue Foot Sue from the Wanted line (another fav CC DP!)
Accessories: Clear EP, Tim Holtz Rock Candy Stickles, sewing machine

That's it for today. Hope you will stop by Our Creative Corner to see the rest of the DT's samples and play along in our back-to-school challenge.

Challenges Entered:
Stamping Vacation - Very Vintage/Anything Faded
Paper Playtime - School Days
Paper Cutz - Back to School
Stampin' for the Weekend - Back to School

Friday, August 13, 2010

Changing Seasons


It's Friday - time for fun with the Fairy, the Prairie Fairy that is. Our challenge to you for Fairy Fun Friday is this inspiration photo. The colors just made me think fall, and since I'm officially in fall now, I decided to take the Villa Road image and color it up into an idyllic autumn scene.

I spent quite a while coloring this with Copics. Then I mounted it onto some ancient SU DP that I had embossed with a new Tim Holtz embossing folder. I added a a vintage calendar downloaded from a free vintage image site, Clearly Vintage. The sentiment was printed on my computer. I purchased that gorgeous piece of hardware from Emma's Paperie over a year ago and it has been languishing in my stash waiting for the perfect home. The brad on the calendar is from Michael's.

Products Used:
Stamps: Villa Road by Prairie Fairy, sentiment was printed on my computer
Paper: Autumn Meadows (retired) DP by SU, Chocolate Chip and Very Vanilla
Ink: Copics, Printer Ink, Creamy Caramel and Vintage Photo DI
Accessories: Collage Texture Fade from Tim Holtz, Spellbinders labels dies, don't remember when I purchased the ribbon

That's it, now it's time to check out the rest of the DT's samples on the Fairy Fun Friday challenge blog. Hope to see a beautiful creation by you entered into this week's challenge! Thanks for stopping by and have a great day.

Blessings & hugs,
Challenges Entered:
If the Shoe Fits - Use Die Cuts

Thursday, August 12, 2010

Tying a Three-Loop Bow


Good morning! I'm back again today as promised with a few quick shots on how I tie my three-loop bow. I apologize for the messy blotter on my desk, but it was a work in progress rather than a formal "photo shoot". This is a very simple bow to tie once you see how it is done. First, tie the first half of a double knot as shown above.


Next, wrap three loops of ribbon - I usually loop it around my fingers three times. For this step, you will need to figure out how wide you want your bow loops to be. Once you have your size adjusted, cut it off the spool.

Now lay those three loops over your knot and tie it again as shown above. (If you are working with satin or some other slippery ribbon, you may want to make it a double knot.)

Here's the tricky part because you will now have four tails. Decide which two will show the least when you cut then. I usually trim the two from the loops I have made, close to where the knot is. Sometimes I lift the knot a bit, insert a drop of glue and then pull the tail so it is just inside the knot and glued there. Just minipulate the loops until you get them arranged nicely.

This bow was made with wired ribbon so it sits up nicely, but I also have great results with any type of ribbon. It works especially well with the crinkled seam binding ribbon that is so popular right now.

Thanks for stopping by today. Let me know if you have any questions. Have a great day!

Blessings & hugs,

Monday, August 9, 2010

Things With Wings - First Simon Says Stamp & Show Challenge Now Live!


Greetings vintage lovers! The appointed hour has come and the fabulous new vintage challenge, Simon Says Stamp and Show, has now kicked off it's very first challenge. It's an easy one this time - Things With Wings. Everybody should be able to play with us - ya gotta have a bird or a butterfly stamp, right? And OMW, what an amazing prize! Check out this pic with all the yummies just waiting for a new home. The prize will be a random drawing, but there is also a judged contest and the top 3 cards each week will receive an awesome blinkie for their blog! Can't wait to see who comes in top three this first week. Will it be you? You can't win if you don't play!

Thanks so much for stopping by to see what I have made for our very first challenge. This past week as been a roller coaster for me. Of course, I was positively elated (and amazed) to be selected as one of the team members of the wonderful new group. But when I checked out the work of my teammies, I was quite intimidated. Wow, there is just unbelievable talent in this new group. And most of them are very skilled in the styles of Tim Holtz and Wendy Vecchi. I wondered how my more frilly, delicate vintage work was going to mesh with these styles and how it would measure up. So what you see here is my first attempt. It's a thank you to Heidi and Linda Elbourne for selecting me and also expresses a bit of my hopes and trepidation. I plan to hang it in my studio to reflect on as I grow in this art. It's my benchmark and at the end of the DT term, I hope to be able to see some significant growth. I hope you can make out what it says. It's choppy by design so I'll give it to you straight. It reads like this: "Thank you for taking me on this unique journey. I'm off in the right direction on a wing and a prayer. I hope I can wing it. I know I will enjoy the journey."

I hope you will stop by the blogs of the rest of the design team and congratulate them on being selected for this team. You will be amazed at the work they do.

♥Linda Elbourne, DT Coordinator - A Crafting Journey
♥ Dan Cumson - My Crafty Life
♥ Lynne Forsythe - The Next Best Thing
♥ Lori Hassler - I Been Thinkin'...'Bout Inkin'
♥ Nancy Crissinger - What's Next???
♥ Nancy Wethington - Art From the Heart
♥ Terry Weitsma-Girbes - Terry's Cards & Creativity
♥ Katie Davis - Chantilly Rose
♥ Kim Costello - Paperbabe

And now get off the Internet and into your craft room. There's craftin' to do so get to it! Can't wait to see your Things With Wings posted over at Simon Says Stamp and Show.
Supplies used: Tim Holtz idea-ology Word Keys, Game Spinners, Swival Clasps, Muse Tokens, Adage Tickets, Grungeboard Mixed Minis and Vintage Shabby Paper Stash. Tim Holtz Stamps Regal Flourish and Flights of Fancy.

Sunday, August 8, 2010

First Challenge Monday

Woohoo, just popping back in with a REAL picture of the first week's prize at the new Simon Says Stamp and Show challenge blog starting on Monday (12:01 a.m. Central Time). Can you believe all these luscious goodies? I want to win -hehehe!!


Get all your vintage goodies ready. We'll be off to a rockin' start tomorrow at the vintage challenge blog Simon Says Stamp and Show. We've got an easy challenge cooked up to start you off so everyone should be able to participate. No special company stamps required, just follow the theme and show us your very best vintage style! There is a super prize for the winner, plus the entries judged as Top 3 will get a special blinky for their blog!
The challenge blog is sponsored by Simon Says Stamp and you know they ALWAYS have fabulous prizes! Here's a sneaky little peek at the first week's prize.

Can't wait to see YOUR entry over at Simon Says Stamp and Show!!
Blog Widget by LinkWithin


I changed my font at thecutestblogontheblock.com