Friday, December 31, 2010

New Beginnings


This week, our challenge theme at Fairy Fun Friday is New Beginnings, something that is on everyone's mind as we head into a fresh new year.  This card really challenge me.  I couldn't find a vintage style image that I wanted to use for this challenge so I went with a different style.  I guess it's good to pull me out of my vintagy rut once in awhile!  I used A Mother's Love digital image from The Prairie Fairy for the polar bears and a freebie sentiment I picked up from Rainbow Echo Designs from her Sentimental Sunday's challenge blog.  (The digital sentiment came with butterflies but I erased them with my Photoshop Elements).  The yummy designer paper was also a digital freebie from Barely Mine

Other supplies used include a Cuttlebug die and snowflake embossing folder for the heart, Crystal Effects, a doily, Stickles, silver ink, silver cord, silver CS form SU, Vintage Photo and Broken China distress inks, Copic markers, felt, SU brad, Martha Stewart branch punch, Prima flowers, floral picks,  and Jo-Ann ribbon.

Now hop on over to Fairy Fun Friday and see the yummy new beginnings that our design team has to stoke your mojo!  Hope to see you playing along with us this forthnight.

Wishing you all the best of blessings in this new year.

Challenges Entered:
Digital Tuesday - Anything Goes
Meljens - Cold and Snowy

Saturday, December 25, 2010

Wishing You a Merry Christmas!

Merry Christmas to all of you who celebrate the sacred day and happy weekend to those of you who don't.  I'm here with our last post of 2010 for Our Creative Corner.  As we close out the year, I want to thank all of you for stopping by each week to see what I've been up to.  Your comments and support mean the world to me and your positive reinforcement letting me know that I actually can make worthwhile art projects have helped to keep me going throughout this past hyper-busy year.  I've had the privilege of serving on some fantastic design teams and have "met" some incredible women.  I know I don't get around to your blogs often enough, but you are all special to me - especially those of you who are regulars who I so enjoy hearing from.  So thank you from the bottom of my heart.  I hope the blogosphere has blessed you as much as it has me.  

Alright, so now on to this week's challenge at Our Creative Corner.  Our host, Sarah Gough, has challenged us to use felt, flocking, flocked paper or felt embellishments on our creations this week.  I am so into using textiles on my cards recently and loved this challenge immediately.  My felt is in the form of die (Cuttlebug/Spellbinders) cut snowflakes.  I used ivory felt and rubbed some Antique Linen Distress Stickles on them for a bit of bling.  And I seem to be very into kraft card stock recently.  I had forgotten how wonderful it is for that rustic country look.  How about this retro style image? I absolutely love it!  The Fairy Queen over at Prairie Fairy has just released it as a digital image and she's giving it away as a freebie on Christmas Day!  Hop over to her blog immediately and sign up to receive her posts and maybe you'll be in time to receive this awesome freebie.  

I'm not going to go into details as I think everything is pretty self-explanatory, but if you have questions just leave them in the comments and check back later for an update to the post.  Now I gotta get some sleep so Santa can come!

Blessings & hugs,

Challenges Entered:
Fussy and Fancy Friday Challenge - Snow
If The Shoe Fits - Get Crafty
City Crafter Challenge Blog - Vintage Christmas

Friday, December 24, 2010

A Krafty Christmas Fairy


Oh my goodness, tomorrow is Christmas!!!  In the back of my  mind, I knew it was coming, but oh, my goodness, it will be here and gone before I know it!  Twice this week I tried to go to the supermarket in the middle of the afternoon, only to give up after cruising the parking lot a few times trying to find parking.  So I got up at 7:00 this morning to hit the supermarket - and it was already packed.  I already know of one thing I forgot - but I don't think I'm going back!  We'll have to do without.  And I remembered that I haven't made any holiday food and since I promised to go shopping with my daughter today, I guess that will have to wait until late this afternoon.  Whew, it's a good thing that I gave priority to making a couple of cards, right?

Since I missed the Fairy Fun Friday post last week, I squeezed in a mid-week card for the "Use Kraft" challenge.  And I'm so glad I did.  It felt great to mess around at my craft table again and I remembered how much I love using kraft CS.  Here I used The Prairie Fairy's Tree Fairy for this, plus the sentiment from her Holly Fairy set.  I really love this vintage holiday fairy set that Roberta came out with this season and have so enjoyed working with these digital images.  I also used Grunge Flourish Hearts from Stempelglede with lots of Vintage Photo distress ink.  And I used a technique that Tim Holtz used on one of his Christmas tags by dabbing one of the white acrylic Paint Dabbers onto the edges of the tag to look like snow.  The snowflakes are from SU's Winter Post set.  I embossed a piece of K&Co. chipboard and then painted over it with the white paint dabber.  When dry, I sanded the high points and used some VP DI on it.  

I think that's about it for the dets on this card.  There's still another week to play in the Kraft challenge at Fairy Fun Friday.  I hope you have a wonderful Christmas Eve.  Keep calm, don't stress - that's my mantra for today.  I'll be back tomorrow with my card for Our Creative Corner.

Blessings & hugs,
Challenges Entered:
If the Shoe Fits - Get Crafty
Stamp Something - Something with a tag or a pocket
City Crafter Challenge Blog - Vintage Christmas

Monday, December 20, 2010

A Vintage Christmas Angel

Hello friends!  So happy to see you back.  I know I've been slackin' on my art - but all for a good cause.  My part time job with my church has completely taken over my life since before Thanksgiving.  I manage a huge food pantry providing weekly food boxes to more than 300 families.  Thanksgiving brought a lot of extra work and the same with Christmas - trying to make sure that all families have some extra food for the holiday and also coordinating some Christmas gifts for some of the families we are closest to.  Plus I have been running another Christmas project for the parish.  Unfortunately, all this extra overtime has caused me to miss a couple of DT deadlines so I want to apologize to my DT leaders and teamies!  I certainly am looking forward to having a bit of a break later this week with the Christmas holiday and hopefully get everything back into balance! 

And speaking of breaks, I am happy to share that this Simon Says Stamp and Show challenge will be a two-week challenge.  Our challenge to you is to show us something from yesteryear.  I had a couple of projects in mind, but just couldn't move them off the drawing board, so my fallback of course is always a card.  Here is my Yesteryear card in my typical vintage style.  I must say that it was a joy to create.  I loved the color palette and the lovely vintage image.  And I am having such fun with textiles lately.  Here I used some lace, some cheesecloth and some crinoline for the bottom petals of the flower.  

I started with a base of SU's new Cherry Cobbler CS and then added a layer of gold CS.  The DP is digital, printed on my home computer. A vintage Christmas angel image was used with Tim's Tinted Vision technique but instead of using a Fragment with it, I used a piece of acetate die cut with the Snow Flurries On the Edge die. Ginger and Latte Adirondack alcohol inks were applied to the back of the acetate with a Adirondack Alcohol Ink Applicator tool to create an aged, stained paper look. The acetate was layered over the vintage image.  Then the remaining alcohol ink on the applicator tool was used on a piece of vanilla CS to create a blotchy aged look for the Believe stamp. The CS was also misted with a mixture of water, Vintage Photo reinker and Perfect Pearls Heirloom Gold, as was the panel that was embossed with the Tim Holtz Notepaper Texture Fade. Both pieces of CS were also sponged with Vintage Photo ink around the edges. The white petals of the crinoline flower were cut with the Alerations Tattered Floral die. The Believe stamp is from the Tim Holtz Mini Holidays stamp set.

That's it for the details of my piece, but be sure to visit the Simon Says Stamp and Show blog.  My team mates have produced another amazing collection of art for this challenge.   You just cannot help but be inspired by what you will see there.   Hope to see you playing along with us this week.   Our very generous sponsor, Simon Says Stamp, is giving away a $50 gift certificate to some lucky random winner.  


And thanks for coming back.  I know I haven't had much to share recently and I appreciate your sticking with me!  Wishing you all a blessed Christmas with family and friends.

Monday, December 13, 2010

A Shabby Chic Technique


Greetings and thanks for stopping by to see what I have made for this week's Simon Says Stamp and Show Challenge.  Our Challenge to you this week is to make something using a Tim Holtz technique.  How fun is that?  He has so many great techniques, especially with the 12 Tags of Christmas just out.  I decided that I wanted to try something that was completely new to me so I went to pg. 49 Compendium of Curiosities and decided on the Shabby Chic technique.  

The construction was pretty straightforward, but if you have questions, just let me know.  After cutting Grungeboard with the Snow Flurries On The Edge Alterations die, products used on it include Expresso and Snow Cap Adirondack Acrylic Paint Dabbers, Tim Holtz Mini Holidays stamp set. A flower was made out of Tissue Tape and topped with a button from the Idea-ology Accoutrements. Some Fragment Charms add the finishing touch.

Now on to the lovely Simon Says Stamp and Show challenge blog to see what the others have made.  I promise you'll be blown away.  I know I certainly was!

Thanks for stopping by and for all your lovely comments!

Blessings & hugs,
Linda

Saturday, December 11, 2010

A Little Late Victorian Sparkle

Hi folks,

I feel like a delinquent blogger.  I haven't been posting much and I've missed you all!  I know I haven't updated my challenge lists in over a week.  I have been so busy with my little part-time job for my Catholic parish, which is supposed to be 20 hours a week.  Hahaha!  Since the end of November I have been working double that and last week it was tripple that number of hours, including 20 over the weekend.  I'm exhausted, my house is a disaster and Christmas is about to steam roll over me!  No time for making cards or blogging either.  So last night when I got home from work at 8:30 p.m., I chose to do some house cleaning instead of my card for Our Creative Corner.  I was expecting my daughter home from college around midnight and wanted to make the house look a little better when she came through the door. 

I got up this morning and finished my card.  Here it is.  Our lovely host Sarah Gough has designed a wonderful sketch for you to follow for our challenge this week.  I love this sketch and think it will be one that I use again - such pretty layers!  I used a bit of my retired (hoarded) Blue Bayou with some Basic Grey DP and a Spellbinders die to create the snowflake.  Two different SU sets were used to stamp snowflakes with white craft ink and the tiny snowflakes are from a Martha border punch.  The sentiment and the Victorian ornament are from Prairie Fairy and the flower and the crinkle ribbon were hand dyed using Rose Red reinker.  Some Rock Candy distress stickles and Crystal Effects finished it off. 

Thanks so much for stopping by.  I'm sorry I haven't been around to visit anyone in the past few weeks.  Don't give up on me.  I'll be back with more regularity after Christmas. 

Blessings and hugs,

Monday, December 6, 2010

Simon Says Stamp and Show...a Holiday Greeting

Greetings friends and welcome to another marvelous Monday and a project for Simon Says Stamp and Show.  Our challenge to you this week is to Stamp and Show a Holiday Greeting, which you can feel free to shape to your own interpretation.

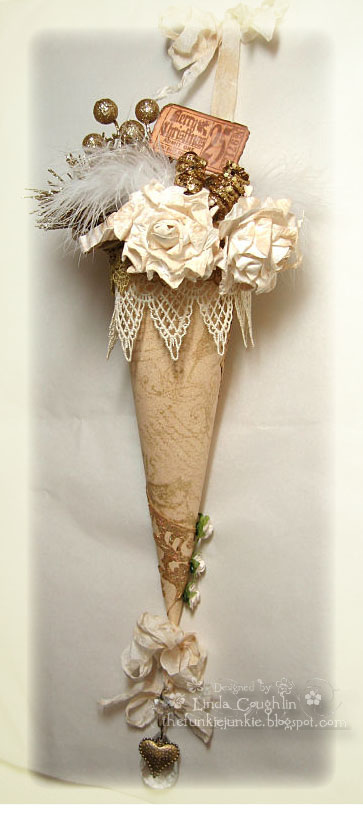
I decided to make a tussie mussie, which I thought would be a lovely way to give a holiday greeting to a friend.  First I randomly used stamps from Tim Holtz's Urban Grunge set in Old Paper distress ink and then clear embossed them.  Next the entire sheet was sponged with Antique Linen distress ink.  A Scrollwork Alterations die cut plus three tiny Prima roses were used to cover where the cone was joined.  An Idea-ology Memo Pin holds the Merry Christmas ticket stamp greeting and while an Idea-ology heart charm altered by coating it with Adirondack Alcohol Ink Gold Mixative adorns the tail of the tussie mussie.


This was such a fun project to do.  It wasn't hard, didn't take too long and I think the result is gorgeous.  I think I'll be making more of these beauties in the future!


Now its time to stop by the challenge blog at Simon Says Stamp and Show.  This week our amazing sponsor is giving away a $50 gift certificate to the lucky random winner, and you always have a chance of being picked in the top 3 by the design team.  And speaking of this talented design team, here are their personal blog addresses so you can see other amazing creations by them.

♥Linda Elbourne, DT Coordinator - A Crafting Journey
♥ Dan - My Crafty Life
♥ Lynne Forsythe - The Next Best Thing
♥ Nancy Crissinger - What's Next???
♥ Nancy Wethington - Art From the Heart
♥ Terry Weitsma-Girbes - Terry's Cards & Creativity
♥ Kim Costello - Paperbabe

Can't wait to see your holiday greeting!

Thanks so much for stopping by today.  Have a great week!

Blessings & hugs

Saturday, December 4, 2010

A Virtual Parade of Tags

It's Saturday again!  And it's December 4th already - how did that happen?  I've had another crazy week and am ready to drop from exhaustion.  I put in a 12 hour day today and still have to work both Saturday and Sunday.  No rest for the wicked this week - LOL!

So I did another quick and easy tag for this week's Our Creative Corner challenge.  I know, three tags almost in a row, but I figured if Tim Holtz can make 12 for Christmas, then I should be able to create tags to march on through December too!

What a tough challenge our December host, Sarah Gough, has dreamt up for us.  It's a color challenge using non-traditional Christmas colors.  Not my cup of tea at all and I almost bailed on the challenge.  But I dug in my heels with the thought that that's what challenges are all about.  And I'm happy to say that enjoyed the challenge and  I really like what I made for it.  Thanks Sarah for giving me a kick out of my cozy little comfort zone!

Here's the dets:
Stamp Sets:  Yuletide Montage and Holidays and Wishes by Stampin' Up!
Paper:  Tempting Turquoise, Kraft, Basic Gray, Rose Red
Ink:  Rose Red, Basic Black, Vintage Photo, image lightly colored with Copics (I wanted to use chalks, but realized I had lent mine to a friend who is a new stamper)
Accessories:  SU Brad, Cuttlebug snowflake EF, Spellbinders Build a Flake die and labels die, flower was made with rolled white CS and painted with a mix of Simple Solutions Medium Acrylic Medium, LuminArte Metalic Mica Luster Pearl and one tiny drop of Rose Red reinker.  This mixture was painted onto the flower and while still wet, glitter was applied.  The lovely turquoise and silver ribbon is from Jo-Ann's and the crinkled seam binding was hand dyed.  

Hope you will play along with us this week.  I'm looking forward to seeing what you come up with for this color challenge...and speaking of that, hop on over to the Our Creative Corner blog and see what the rest of the team did for this challenge!

Thanks for stopping by - have a great weekend!

Blessings & hugs,

Friday, December 3, 2010

Shower of Stars

Good morning friends!  I hope your last work day of the week is off to a great start.  I'm sure it will be a busy weekend for everyone now that we are into the Christmas season.  This week at Fairy Fun Friday our challenge to you is "Use a Star".  That's a perfect theme for a Christmas card which I have made using one of the adorable Christmas Fairies from the Prairie Fairy (colored with Copics).  This one is called Holly Fairy and she comes with a poinsettia and sentiments.  My sentiment is from another Prairie Fairy Set called Candy Cane Fairy.  Check out all the wonderful seasonal digital images in the Prairie Fairy's store.  

I randomly stamped snowflakes using white craft ink on kraft card stock and paired it up with Cherry Cobbler.  A large snowflake "doily" was created by cutting five smaller snowflakes and adhering them to the back of a scaloped circle.  The stars were cut with a Sizzix die and embossed with Judi-Kins Egyptian Gold embossing powder.  I applied Antique Linen distress stickles to the felt star and the metal sentiment holder is from the Vanilla Hodgepodge Hardware from SU.  The distress stickles were also used on the fairy's wings.  

There you have it - a very simple card for this lovely challenge.  Can't wait to see what you will make using stars.  Stop by and visit us at Fairy Fun Friday.  Thanks for stopping and for your comments.  Have a great day!


Blessings & hugs,

Monday, November 29, 2010

Another Christmas Tag

Good morning!  Welcome to my weekly post for Simon Says Stamp and Show.  I have another Christmas tag to share with you on this marvelous Monday.  I love tags so it wasn't a hardship for me to make two in a row.  Usually my cards are pretty elaborate and involved so making a tag seems quick and easy for me.  This one is heavily on the vintage side.  I used two vintage images from one of the vintage sites listed on my sidebar.  ( I'm not sure exactly where they came from, but if anyone is dying to know, leave me that question in the comments and I'll track it down for you.)

This is a fairly simple tag.  I wanted to do another tag in sepia tones using lots of Vintage Photo distress ink. The newspaper text background and the vintage images have been sponged with Vintage Photo distress ink. The stars were cut with a Sizzix die out of corrugated cardboard and crinoline. They were sprayed with a mixture of Vintage Photo reinker and Heirloom Gold Perfect Pearls. The star brads were embossed with Antique Linen distress embossing power and a bit of the VP mixture was applied.

Be sure to stop over to the Simon Says Stamp and Show challenge blog to check out the other tags my fellow design teams members have made.  And while you're at it, check out their personal blogs too:

♥Linda Elbourne, DT Coordinator - A Crafting Journey
♥ Dan - My Crafty Life
♥ Lynne Forsythe - The Next Best Thing
♥ Nancy Crissinger - What's Next???
♥ Nancy Wethington - Art From the Heart
♥ Terry Weitsma-Girbes - Terry's Cards & Creativity
♥ Katie Davis - Chantilly Rose
♥ Kim Costello - Paperbabe

Thanks so much for stopping by my blog today.  Thanks also for your lovely comments.  I sincerely appreciate your encouragement!

Blessings & hugs,
   

Saturday, November 27, 2010

Tag, You're It!

Good morning!  So happy you stopped to visit my blog today to see what I have for this week's Our Creative Corner challenge.  This week we are encouraging you to make some sort of tag - it can be purely as an artistic expression or take this opportunity to make a holiday gift tag.  It can be stand alone or as part of a card or other project. Mine is a holiday decoration to hang on a door knob or as a wall hanging.  I used the lovely Christmas angel from the recent Peace on Earth Whimsey Stamps release to make a gold and sepia toned tag.  The background of the tag was stamped with the Whimsey Classified Ads stamp in Vintage Photo and the next layer was embossed with the a Stampin' Up! embossing folder.  The flourish was cut with a Cuttlebug die, sponged with Vintage Photo distress ink and randomly embossed with UTEE/gold EP.  The lovely angel was colored with Copics and Antique Linen Distress Stickles were applied to her wings.  The flower was cut from ivory felt and crinoline dyed with Vintage Photo and Heirloom Perfect Pearls.  The Tim Holtz Tattered Floral die was used to cut the flower pieces.  

Hope you will stop by Our Creative Corner to see the rest of the design teams' tags.  Can't wait to see what you will be making this week!

Monday, November 22, 2010

A Vintage Christmas Rose

Welcome to my weekly post for Simon Says Stamp and Show.  So happy you have stopped by this week to see my  most recent project.  I hope you are not disappointed with the results of my effort this week - LOL.  I can't decide if I like it or if it is just a total mess.  You know, sometimes an idea that seems good at the start just doesn't end up that way :).  Our challenge to you this week is to show us your distress inks.  Honestly, I just couldn't come up with an idea to highlight distress inks.  I use them on just about every project I do, but mostly in a subtle way to achieve an effect, not really highlighted.  Plus I have been lights-out busy and working gobs of overtime so  I was late getting started and hadn't really been noodling ideas all week like I usually do.  So Saturday rolls around and I'm still working overtime and wondering what in heck to make.  I got home and searched through my craft room and came up with a Dollar Store frame and decided to alter it.  I really would have liked to use crackle paint on the frame, but that darn stuff takes 3 days to dry.  I decided to make the frame embossed metal.  I glued aluminum foil to cardstock and then ran it through an embossing plate.  I used a variety of alcohol inks on it starting with Cranberry.  It was too bright so I toned it down by dripping Ginger alcohol ink around the edges.  Still didn't please me so I added some of the gold mixative to Ginger alcohol ink and alcohol blending solution in a mini mister and sprayed it all around the frame.  At that point, I still wasn't sure about it, but decided it was time to move on - LOL.  

The corrugated cardboard backing was misted with my homemade glimmer mist of Vintage Photo ink, water and a scoop of Heirloom Gold Perfect Pearls (am totally hooked on that stuff), then slathered with Tattered Rose crackle paint.   Fired Brick DI with a touch of Vintage Photo DI was used to saturate the paper for the handmade flowers which were cut with the Tim Holtz Tattered Florals die. Pine Needles DI was used for the GrungeBoard flourish.  The snowflakes were cut with the Spellbinders Snowflake die, stenciled with Vintage Photo DI then dabbed with Antique Linen Distress Stickles. Other Tim Holtz products used were Tissue Tape, a Hitch Fastener and a Swival Clasp.  

That's it for me this week.  So happy you took the time to stop by.  Let me know if you have any questions on technique or materials that I didn't cover.  Be sure to stop by Simon Says Stamp and Show...Your Distress Inks this week.  I'd love to see what you can do with distress inks!  Here is the rest of the team.  I'm sure they would love it if you visited them and left them some love!

♥Linda Elbourne, DT Coordinator - A Crafting Journey
♥ Dan - My Crafty Life
♥ Lynne Forsythe - The Next Best Thing
♥ Nancy Crissinger - What's Next???
♥ Nancy Wethington - Art From the Heart
♥ Terry Weitsma-Girbes - Terry's Cards & Creativity
♥ Katie Davis - Chantilly Rose
♥ Kim Costello - Paperbabe
Blessings & hugs,

Saturday, November 20, 2010

A Holiday 3-D Project


Good morning, friends.  Welcome back for my Saturday post for Our Creative Corner.  I'm the host again this week and I am challenging everyone to make a three dimensional holiday project - just a bit of a shove to push you all out of you comfort zone.  I'll be the first to admit that I used to HATE doing anything other than a card.  But I've had to do a number of different projects for design team requirements in the past few months and I am happy to say that not only have I lost my fear of doing them, I actually enjoy them.  This one was a lot of fun - or actually, it would have been if I hadn't been so pressed for time. Thursday night when I checked to see what I needed to do for this week's challenge, I about freaked out to see that it was a PROJECT!  So I stayed up late Thursday night to make the box and very late Friday night (because I didn't get home from work until 9:00 p.m.) to do the image,  handmade flowers and handmade bow.   


I'm really pleased with how this came out.  I don't know who I am going to give it to yet, but I think several of my friends would enjoy having it.  I got the idea for the box from this tutorial.  I didn't follow it exactly and am sorry because I made a couple of mistakes that I'll have to remember to do differently next time.  

Here's the dets:  That sweet, sweet fairy is a new image from the Prairie Fairy, colored with Copics with Rock Candy Stickles on the wings and Crystal Effects on the candy cane.  The snowflake is a Spellbinders die cut with Vintage Photo sponging and glitter.  The flowers were hand made using the Tim Holtz Tattered Flowers die and the Sizzix Flowers and Vines #3 die.  I hand dyed the shabby seam binding to try to match the fairy's dress using numerous colors of Stampin' Up! and Tim Holtz distress inks.  IRL it looks like a closer match that the photo shows.  The hinges were cut from Grunge Paper with a Spellbinders label die, then sponged with Vintage Photo ink and clear embossed.  They came out pretty cool, with almost a leather type of look.  Oh, almost forgot, that is a Layers of Color stamp across the top part of the heart, which by the way was cut with an old Creative Memories heart cutting template.  

I'm very dissatisfied with my photos and editing lately.  I have spent hours taking pictures and more time editing, but can't seem to get the lighting right and the details don't seem crisp and visable.  I'm including a couple of close-ups so you can see the details better.


I think that's enough details.  Of course, if you have any questions, just leave them in the comments and check back later.  I'll update the post with the information you requested.  Not it's time to hop on over to Our Creative Corner and be inspired by the rest of the design teams' projects!

Blessings & hugs,

Challenges entered:
Paper Sundaes - Your Favorite Toppings (flowers and shabby seam binding are some of my very favs!)
My Partner in Crafting Crime - Marker Madness
Digital Tuesday - Anything With Wings
ABC Challenge - H is for Holiday
The Creative Cottage Challenge - Make something for someone special at Christmas
Fresh Brewed Challenges - Show off your style
4 Crafty Chicks - Anything But a Card
Paper Romance - Make a card/project with some of  your favorite things
Stampin' B's - Use Snowflakes
Frosted Designs - Distressing
Winter Wonderland - Make a Christmas Decoration
Lots to Do - Share Your Favorite Technique (mine is Vintage)
Secret Crafter Saturday Challenge - Handmade Christmas Gifts

Friday, November 19, 2010

Peace and Joy


What a long and exhausting week I have had - so much overtime and so little crafting time.  And way too long between posts!  So I am happy to be back today for Fairy Fun Friday with a card I made with one of the Prairie Fairy"s beautiful new digital Christmas images.  This one is called Christmas Doves and comes with a full set of sentiments too.  There are several other vintage type Christmas fairy sets available to so be sure to check out the Seasonal section of the store. 

Our challenge theme this wee is Buttons & Bows.  I decided  to go with a white-on-white theme for this card.  The edges of the bottom layer of white have been glittered with Star Dust Stickles and the next layer up embssed with the SU Petals A-Plenty embossing folder.  The die cuts that the doves are perched on and the sentiment is on are from the Spellbinders Shapeabilities Lattice set.  A label punch from SU was used to punch the vellum piece that  the sentiment is on and Stickles were lightly applied around the edge.  The buttons were embossed with silver EP and the Stickled flourish was cut with a BossKut die.  The fabric flower was made by cutting four shapes from crinoline with the Tim Holtz Tattered Florals die.  I wet it with plain water, scrunched it and dryed it with my heat tool, dabbed on a bit of glue here and there and sprinkled SU Dazzling Diamons glitter over it.  I've had that pretty clear plastic and silver button in my stash forever - knew someday I would find a use for it!  The flower sits atop a large bow made of white tulle - sorry you can't see it too well in the photo. 

Now that you 've seen my card, hop on over to the Fairy Fun Friday blog to see what the other design team members have to show.  I had a peek at some really beautiful samples that you are going to love!

Thanks so much for stopping by today.  Hope you have a marvelous day!

Blessings & hugs,


Challenges Entered:
Crafty Cardmakers - Dry Embossing
Polycraft Monday Challenge - A Glittery Christmas
Digital Tuesday - Anything With Wings
Tuesday Taggers - Peace, Love and Joy
Tuesday Throwdown - Buttons and Bows
Crafts and Me Challenge - Glitter
CCEE Stampers - Buttons
MelJen's - Sparkle and Shine
PaperPlay Challenges - Let it Snow
If the Shoe Fits - Tickle Me with Tinsel
Paper Cutz - Lots of Bling
Top Tip Tuesday - Buttons Galore!

Monday, November 15, 2010

Simon Says Stamp and Show...Whatever Makes You Happy

Good morning and welcome back to another marvelous Monday morning with Simon Says Stamp and Show.  This week we invite you to show us Whatever Makes You Happy.  What a cool  challenge - well actually it's not very challenging - LOL.  All you have to do is make whatever sort of vintage creation pleases you and link it up to our challenge site.  You might just be the random prize winner or come in Top 3 and get that coveted badge for your blog. 

Here's what makes me happy this week.  As you can see, I am FINALLY getting into the Christmas mood.  I really resisted it because I wanted to give the other fall hollidays and harvest celebrations their due plus I didn't want to get burnt out on Christmas by sarting too early.  But what really makes me happy is distressing and aging my craft projects.  Honestly, there is nothing more fun for me than taking something new and making it look old and worn out.  I really did have fun with this one.  The edges of the paper were distressed with a Tonic Paper Distresser and then I took a Koi Water Brush, picked up some brown ink and wet the edges of my paper with it.  I took my fingernail and roughed up the damp paper a bit more.  I think it gives it a subtley different distressed look.  Other products and tools used here are: Martha Stewart Snow Flurry Border Punch, Spellbinders Create a Flake I, Ranger Clear UTEE, Vintage Photo Distress Ink, and Tim Holtz Odds and Ends stamp.   The vintage image is from a LunaGirl holiday CD set I purchased a couple of years ago.  The red gingham ribbon was a bright, crisp red and white with sort of a plastic red edging on each edge.  It needed to look OLD.  So I mushed it around in a puddle of Vintage Photo reinker and water, crunched it up and dried it with my heat tool.  That made the plastic edging peel right off and then I frayed it a bit more.  The result pleased me more more than the original bright newness did. 

Now it's time to skip on over to the Simon Says Stamp and Show challenge blog and also stop and say hello to our fabulous design team on their personal blogs:

♥Linda Elbourne, DT Coordinator - A Crafting Journey
♥ Dan - My Crafty Life
♥ Lynne Forsythe - The Next Best Thing
♥ Nancy Crissinger - What's Next???
♥ Nancy Wethington - Art From the Heart
♥ Terry Weitsma-Girbes - Terry's Cards & Creativity
♥ Katie Davis - Chantilly Rose
♥ Kim Costello - Paperbabe


Thanks again for taking the time to stop and see what I have made for this week's Simon Says Stamp and Show challenge.  I hope you are inspired to play along this week. 

Blessings & hugs

Saturday, November 13, 2010

Today's a Two-fer


Hi friends, I hope your weekend is getting off to a great start.  I appreciate you starting your Saturday off with my Our Creative Corner post.  Today's post is also for Fairy Fun Friday.  But it's not Friday, you say.  And you are right!  I cheated a bit with my DT samples this week and made one card for both challenges.  The theme this fortnight over at Fairy Fun Friday is handmade flowers and this week's Our Creative Corner challenge is the color combo shown below. 

The image I used here is from The Prairie Fairy.  I guess I am the official vintage representative on that design team.  I asked our Fairy Queen Roberta to come up with some fall vintage style images and she drew an entire set which you can find in her store.  It's called Fall  Harvest.  I love it.  Last week's Fairy Fun Friday card was made with the same set.  The image was colored with Copic markers and I made the sentiment on my home computer.  The paper is digital from Little Scrap Garden (Coming Home paper pack, but I don't think that particular paper pack is currently available).  The flower was made from crinoline and cut with the Tim Holtz Tattered Florals die.  Spellbinders dies were also used as was the Tim Holtz Collage Texture Fade.  The wonderful gold net ribbon is from Flourshes (as is the white card stock I use.  It works wonderful for coloring with Copics) and the gold half pearls from Michael's.  That's about it.  Oh, and I did sprinkle a bit of UTEE/Heirlook Gold Perfect Pearls on the embossed panel although it doesn't show much.  I think I need to add a bit more Perfect Pearls to the mix. 

Hope you stop by both challenge blogs to see what the other designers have made.  And hope to see you playing along this week too.  Have a great one!

Blessings & hugs,


Challenges Entered:
City Crafter Challenge - Thank You
Shirley's 2 Girls - Thanks with a twist - add a pumpkin
Crafty Catz - Paper Tearing
Frosted Designs - Use Thanks or Thankful on your card
If the Shoe Fits - DYI (use a handmade embellishment on your card)
Stamp Something - November Digi Day
Drunken Stampers - Sewing

Tuesday, November 9, 2010

Another Whimsey Release Sneak Peek

I have another sneak peek for you today for tomorrow's Whimsey Release.   I have so enjoyed working with this lovely Peace on Earth set which will be available from Whimsey Stamps on November 10th.  I can't wait to show you the entire project.  The blog hop kicks off at noon ET on November 10th.  Hope you will be able to join the hop and maybe even win one of the stamp sets being released.

Blessings & hugs,

Monday, November 8, 2010

Whimsey Release - Sneak Peek

Good morning!  I have some exciting news to share.  I was honored to be asked to join the Whimsey Stamps release blog hop this week as a guest designer.  On November 10th, Whimsey Stamps will be releasing 6 new stamps and sets, including images and new sentiments sets and background stamps.  The stamps were designed by Crissy Armstrong, Melissa Jenkins and Ann Vento.  To design with for this release, I was given a beautiful vintage set designed by Crissy Armstrong called Peace on Earth.  You'll be seening more of it this week, but for now, I just wanted to give you a glimpse of what is coming.


I'll have another sneak peek for you tomorrow and then the full project on Wednesday, November 10th.  Hope to see you then.  Have a great day.

Hugs and blessings,

Sunday, November 7, 2010

Can Love Be Measured?


Good Monday morning to you, my friends.  So happy to have you start your week with my Simon Says Stamp and Show post.  We had such a great response to our shabby challenge.  If you played along with us, please know how much we appreciate your participation and best of luck in the drawing and Top 3 awards!

This week Simon Says Stamp and Show us your favorite Tim Holtz stamp.  Oooh, how tough is that?  How DO you pick a favorite Lord Tim of Holtz stamp????  I don't have a huge assortment of Tim Holtz stamps (although it is growning - LOL!) but I still had a tough time deciding.  I finally went with this bird and branch stamp along with other stamps from the Urban Grunge set plus lots of other wonderful Lord Tim embellishments. The tag was sponged with three colors of Tim Holtz distress inks, then a journaling ticket, tissue tape, ruler ribbon, a type charm, a muse token and a hinge clip were added.

I made the theme of the piece love and asked the question - can love be measured?  I included units of measure such as the measuring tape, the calendar tissue tape, the numbers in the upper left.  The type charm has an L for love and the muse token has an F and the word "Forevermore".  I like to pull all my embellishments together with a central theme and was happy at how this all came together.  

I hope you will be able to choose a favorite Tim stamp and play along with us this week.  Definitely make time to swing by the other design team members' blogs.  You will most certainly be inspired by what you see there!

♥Linda Elbourne, DT Coordinator - A Crafting Journey
♥ Dan - My Crafty Life
♥ Lynne Forsythe - The Next Best Thing
♥ Nancy Crissinger - What's Next???
♥ Nancy Wethington - Art From the Heart
♥ Terry Weitsma-Girbes - Terry's Cards & Creativity
♥ Katie Davis - Chantilly Rose
♥ Kim Costello - Paperbabe


Thanks so much for stopping by today.  I really appreciate your comments.  They are so encouraging to me!

Saturday, November 6, 2010

An Attitude of Gratitude

Good morning, friends, and thanks for starting your Saturday out with my post for Our Creative Corner.  This month, our host is yours truly and the challenge I have cooked up for you is "An Attitude of Gratitude".  I have to say that ever since I was a young person, I have keenly felt how blessed I have been.  In this season of gratitude, I thought it would be good for us to reflect upon something that we are grateful for and then to make a card that is inspired by that feeling.  This week, my dad celebrated is 85 birthday.  He is blessed to be in good health and is still quite active.  My mom had a stroke 3 years ago and he has been her main caretaker.    We are all blessed to have him in our lives.  His hobby is antique tractors and everything about them.  He buys them and restores them and on weekends, especially at this time of the year, he and my mom travel in their mini-motorhome to tractor shows. A few years ago, I purchased this Tractor Time set from Stampin' Up and have used it several times to make cards for him.  But it has been about two years since I last used it.  So I dusted it off and created this birthday card for him.  

I know you are probably tired of seeing it, but I love the technique I have been using lately of embossing the edge with UTEE mixed with gold Perfect Pearls and sponged with Vintage Photo DI.  I used it here for the bottom layer.  The frame around the main image was made using the Spellbinders Labels 1 die and all the stamps from the Tractor Time set.  I stamped with Walnut Stain distress ink and clear embossed it, then sponged with Vintage Photo distress ink.  The hardware is HodgePodge Hardware from SU and the sentiment was computer generated.  I think the rest is self explanatory.  Let me know if you have any qeustions.

Thanks so much for stopping by.  I very much appreciate your comments.  Now hustle on over to Our Creative Corner to see what the rest of the team has made.

Update:  A reader asked what card stock I use for embossing with UTEE.  Other than for coloring with Copics, I use Stampin' Up CS pretty much exclusively.  Their CS is 80# and it does curl and warp a bit when the heat gun is applied for the longer time it takes to melt the UTEE.  However, it seems to relax as it cools and flattens back out.  For this particular card, the bottom corners did want to curl a bit, but that is the first time that has happened and I think that was because I heated it for longer than was necessary.  

Blessings & hugs,
Challenges entered:
Paper Sundaes - One For the Boys
Crafty Cardmakers - Stitching
Oldie But Goodie - Distressing
Cards for Men - Anything Goes, as long is it is for a male
Papertake Weekly - A Penny for the Guy
Raise the Bar - Let's See Those Curves

Friday, November 5, 2010

Fall Flowers


It's Friday again - where did the week go?  The fairies over at Fairy Fun Friday all got together this week and had a blast making our own flowers.  And that's our challenge to you for this fortnight - make your own flowers.  Wow, there are just SOOOO many way to make your own.  I don't have the time right now, but will try to update this post later this evening and include some of my favorite links for creating handmade flowers. 

So please check back later for all the details for my card and some valuable links too.  Right now, have to fly out the door to work.  Be sure to hop over to Fairy Fun Friday to see what the fairys have for your inspiration this week.  And check out the Prairie Fairy store for this charming new vintage-style image I have used here. 

UPDATE:  Okay, worked a 10 hour day, received 4000 pounds of food from our local Feeding America affiliated food bank, supervised the securing of the food, supervised the packing of food bags and finally, stood a counter for 2 hours and distributed food to local out-of-work, elderly and homeless individuals and families.  Now I'm back home and ready to get into the artistic groove.

I promised to share some of my favorite links for making hand made flowers.  Here are a few:

Creations with Christina - one of my favorites and the way I made these flowers
Vanja's Crafty Den - Torn paper flowers
Sherry Sheever's video tutorial for making handmade flowers - another of my favorites
Another Sherry Cheever tutorial for hand made flowers
Dimensional Flowers from SplitCoast Stampers

That's it for tonight.  I have to get some sleep.  I have to be back to work at 8:00 a.m. for another busy day - the story of my life until after the holidays.  Hopefully then things will slow down a bit!

Blessings & hugs,

Challenges entered:
Crafty Cardmakers - Stitching
City Crafter - Get Your Digi On
Tuesday Throwdown - Be Thankful
Creative Cottage - Embossing
Raise the Bar - Let's See Those Curves

Monday, November 1, 2010

A Shabby Pumpkin


Hello,  I hope you all had a fun Halloween and a great weekend!  I'm back here today with another marvelous Monday with Simon Says Stamp and Show.  This week we want you to show us Something Shabby.  Well, you can imagine that was hardly a challenge for me since seldom do anything that isn't shabby!  So I challenged myself to change it up a bit by doing a home decor project instead of my usual shabby cards.  

I saw an item made out of felt recently and it inspired me to head out to my local fabric store to see what they had in the line of felt.  I already had the idea of a pumpkin in my mind.  They only had a bright, almost neon, orange felt so I decided to go with this rust color which I really liked.  While I was there, I picked up some stone beads and copper wire for embellishments too.  I drew a pumpkin pattern and cut two out of the felt, stitched around the edge leaving an opening in the top which I used to stuff it.  I hand stitched the ric rac to form the ridges which sort of quilted it.  (Saturday is college football day in our household so I actually relaxed in front of the TV while watching the Gators play - well, tried to relax at least as it was a bit of a tense game for us!)

For my flower, I once again returned to canvas which was cut with the Tim Holtz Tattered Floral die and dyed with Rusty Hinge and Peeled Paint distress inks.   It's all held together with a bit of Idea-ology Foliage The maple leaves were cut from Ten Seconds Studio metal, embossed with the Tim Holtz Cracked texture fade and smudged with Adirondack alcohol ink.  Charms made with Tim Holtz Fragments and vintage Thanksgiving images provide a finishing touch.

What do you think about my departure from my shabby norm?  Be sure to stop over to Simon Says Stamp and Show to see what the rest of the DT has shabbied up for your inspiration.  They're some of the shabbiest artisans around so their work is sure to delight you.  Stop by their blogs and leave them some love while you are at it!
♥Linda Elbourne, DT Coordinator - A Crafting Journey
♥ Dan - My Crafty Life
♥ Lynne Forsythe - The Next Best Thing
♥ Nancy Crissinger - What's Next???
♥ Nancy Wethington - Art From the Heart
♥ Terry Weitsma-Girbes - Terry's Cards & Creativity
♥ Katie Davis - Chantilly Rose
♥ Kim Costello - Paperbabe


Thanks for starting your week out with Simon Says Stamp and Show.  I hope you will come play with us this week.  We're going to have such shabby fun!  Look at this awesome prize that our generous sponsor Simon Says Stamp is giving to one random winner.  All you have to do is enter and maybe your entry number will be the lucky winner this week!


Thanks again for visiting.   I surely do appreciate your comments.

Blessings & hugs,
Blog Widget by LinkWithin


I changed my font at thecutestblogontheblock.com